When swinging a golf club around the body, there are a number of different checkpoints players can use to see if their club face is in the correct position.
A common mistake some golfers make is to believe they must keep the club face pointed at the ball for as long as possible during the back swing. This is not the case as a technically sound back swing moves away from the ball on an inside and upward plane. Keeping the club face pointed at the ball throughout this path would in fact close it in relation to the target.
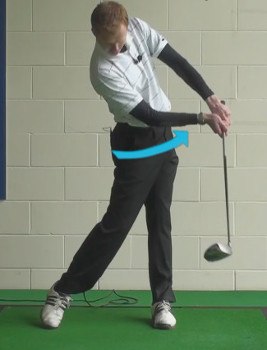
After impact, the club face should rotate fully mirroring the positions of the back swing. If the swing sequence is correct, the follow through should be free and flowing. Follow these checkpoints and you are sure to hit straighter shots.
When executed correctly, the golf swing is a smooth movement from start to finish. Sure, you have to technically stop the club at the top to change directions, but even the transition can appear to be a smooth, even action. However, even within a smooth swing, there are a number of checkpoints you can use to evaluate the quality of your swing. In fact, check points are one of the best ways to monitor your swing positions so you can make any adjustments that may be necessary.
In this article, we are going to discuss how you can use various swing checkpoints to improve your game. We’ll talk about both the full swing and the short game, as checkpoints can be a valuable tool in both areas. If course, it’s one thing to notice problems in your swing, but it’s another thing entirely to actually fix those issues. So, once you figure out what is going wrong, you’ll need to put in plenty of hard work to correct the problem and improve your results.
All of the content below is based on a right-handed golfer. If you happen to play left-handed, please take a moment to reverse the directions as necessary.
— Before the Swing Begins
Many of the important check points you can monitor will be found before the swing even starts. Your address position is an extremely important piece of the puzzle in golf, yet many players virtually ignore this element when practicing. If you can learn how to put your body in a great position prior to starting your swing, the rest of the swing will become much easier.
So, what should you be looking for when taking your stance? The points listed below are a great place to start.
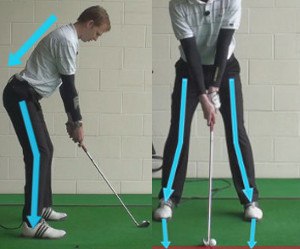
- Flexed knees. This one is the first point on our list for a very good reason. At address, you’ll want to make sure your knees are flexed so you have a solid foundation on which to build your swing. Without your knees flexed, it is going to be hard to execute important fundamentals later in your swing, like maintaining balance, making a big shoulder turn, and more. It’s easy to get last at address and keep your legs straight, but straight legs will not help you build a dynamic action. During an upcoming practice session, experiment with different amounts of knee flex until you find a stance that is comfortable and promotes an athletic action.
- Flat back. Another key point to check in your address position is the angle of your back. Ideally, you will be able to keep your back roughly straight from your waist on up to your neck. This flat back position is going to make it easier to turn both back and through in the golf swing. If you hunch your shoulders at address and let your back curve up near the top, it will be harder to achieve a great turn. And, even if you do turn effectively, your swing plane may be steeper than you would like. Believe it or not, your knee flex is actually closely connected to your flat back position, as sitting down into your stance will make it easier to keep your back flat. Use a mirror to check on your position at address to make sure that your knees are flexed, and your back is in a strong, flat position.
- Tilt from the hips. This is the last piece of the address position puzzle. Once you are in good shape with regard to your knee flex and your back, you need to make sure you are tilting forward from the hips to get your upper body out in a position to make a swing. If you are perfectly upright with your upper body at address, you won’t be able to get your swing down to the ball in a comfortable manner. You need to get out over the ball, but we’ve already discussed in the point above that hunching over with your shoulders is not the way to go. So, the only other viable option is to lean forward from your hips, which is exactly what you should do. It is the flex in your knees that will make it possible for you to tilt forward without losing your balance and falling over. In fact, when you bring all three of these points together properly, you should feel quite comfortable in your address position.
The three key address position checkpoints that we have highlighted in this section are all rather simple to evaluate, and if you are struggling with these points, it shouldn’t take you long to get on track. The great thing about working on your pre-swing position is that it’s easier to make improvements than it is when working on the dynamic portion of your swinging action. Of course, you’ll still need to put in some work to make improvements, so spend some time in front of a mirror (without even holding a club) to practice getting your body into the right spot. After a while, the right position will feel completely natural, and your ball striking will take a big step forward as a result.
— Backswing Checkpoints
Once the club gets moving, things get a little more complicated. For one thing, it can be hard to check your status as you go, since the whole swing only takes a couple of seconds to complete. By the time you have reached one backswing checkpoint, you are already well on your way to the next. So, how do you get around this problem? Fortunately, we live in an age of advanced technology, so you can simply turn to your smartphone for assistance.
By recording your swing on video, you can easily break it down frame by frame to figure out where you might be going wrong. During your next visit to the driving range, ask a friend to record your swing on your phone. Or, if you are practicing alone, find a way to position your phone such that you can take a video without having your hands on the device. If you have never before recorded your swing and watched it back, you might be in for a bit of a surprise – your golf swing may look quite a bit different than it feels.
Once you’ve made some recordings – from both the down the line and face on positions – analyze your technique using the checkpoints listed below.
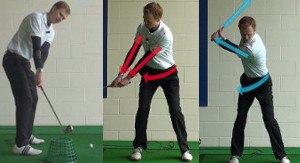
- Six inches back. The first checkpoint you will want to look at in your backswing is found only a few inches behind the ball. As you are watching your swing video, stop the recording as soon as the club head is (roughly) six inches behind the ball. What you want to see at this point is that very little is happening with the swing. Your body should not be moving from side to side, and your hands should not yet be involved in the swing at all. Instead, you should be moving the club with your shoulders as you rotate the upper body away from the target. The takeaway should be very quiet and controlled, as you get the swing started gradually before things pick up later on. If there is a lot of movement going on early in your swing, work on simplifying your takeaway until your shoulders are doing virtually all of the work.
- Halfway back. In golf-speak, the halfway back position in the backswing is found when the club shaft is parallel to the ground. At this point, pause your video again and examine your positions to see how you have done since the last check. Again here, not much should have changed, other than the fact that your hands may have gotten involved a bit more. The swing should still be driven by your shoulder rotation at this point, and you should be nicely balanced with your weight pretty much centered between your feet (you may have moved a bit toward your right foot, but that shift shouldn’t be significant). It’s common for the hands to have done too much by this point in the swing, which can lead to the club shaft being way inside the proper plane. If your hands are too busy early in your swing, work on making some half-length practice swings without using your hands at all. This should help you get a feel for how you can move the club back and through without hand action. Your shoulders are a more reliable way to move the club than your hands, so always favor shoulder rotation to excessive hand action.
| GOLF FIXES BY PGA PROS |
|---|
| Strategy Points And Technique To Use For Golf Explosion Shots | Video | Article |
| Three Key Points About Playing Golf Shots Near The Face Of The Bunker | Video | Article |
| A few chipping points to improve your golf consistency | Video | Article |
| Club Selection Top Two Points When Golf Chipping | Video | Article |
| Using The Right Equipment To Make The Golf Ball Check | Video | Article |
| Good Lie Pitch And Check Shot | Video | Article |
| How to Check If Your Golf Swing Is On Plane | Video | Article |
| Hold Clubface Open to Make Pitch Shots Check | Video | Article |
| Head Face Check at the Top | Video | Article |
| Hold The Golf Club Face Open To Make Pitch Shots Check | Video | Article |
| Check Clubs, Setup to Prevent Contact On Toe | Video | Article |
| Check Ball Flight for Clues to Best Correct– Slices and Hooks | Video | Article |
| Check Green’s Break Before Lining Up Bunker Shots | Video | Article |
| Perfect Technique To Make The Golf Ball Check | Video | Article |
| Using The Right Equipment To Make The Golf Ball Check | Video | Article |
| Good Lie Pitch And Check Shot | Video | Article |
| How to Check If Your Golf Swing Is On Plane | Video | Article |
| Hold Clubface Open to Make Pitch Shots Check | Video | Article |
| Head Face Check at the Top | Video | Article |
| Hold The Golf Club Face Open To Make Pitch Shots Check | Video | Article |
| Five Common Golf Bunker Mistakes – Not Checking Landing Point | Video | Article |
| How To Control The Swing Low Point For Bunker Shots | Video | Article |
| Causes Of Why My Golf Divots May Point Left | Video | Article |
| Check Your Distance From The Golf Ball At Set Up | Video | Article |
| Check Your Golf Divots For Swing Information Feedback | Video | Article |
| Check your Distance from the Golf Ball at Setup | Video | Article |
| Perfect Pitching Conditions To Make The Golf Ball Check | Video | Article |
| LESSONS |
|---|
| Belt High Check Point | Video | Article |
| 8 On Plane Swing Check Points | Video | Article |
| Check Points When Taking The Golf Club Back Far Enough | Video | Article |
| Key Points To Avoid Golf Shanks | Video | Article |
| Key Points To Help You Stay Behind The Golf Ball | Video | Article |
| Other Related Points For A Full Golf Finish Position | Video | Article |
| A Few Related Points Of The Golf Downswing | Video | Article |
| Three Points Relating To A Bowed Left Wrist In The Golf Swing | Video | Article |
| Additional Points To Improve Golf Posture | Video | Article |
| What Are The Key Points The Fingers Play During A Golf Shot | Video | Article |
| Golf Follow Through-The Finer Points | Video | Article |
| Butt of the Club Points at Belt Buckle | Video | Article |
| Pitch Shot – Style Points vs High Percentage | Video | Article |
| Key Points For The Ultra Wide Golf Swing | Video | Article |
| Key Points Of A Connected Golf Swing | Video | Article |
| Belt High Check Point | Video | Article |
| Half Way Check Point Of Club Face In The Golf Swing | Video | Article |
| Club Positions Check for On Plane Swing | Video | Article |
| Keeping the Hips in Check on the Downswing | Video | Article |
| Angel-Cabrera Golf Swing – How To Check Your Footwork | Video | Article |
| How To Check The Club Face Is Square At Impact | Video | Article |
| Checking Your Golf Finish Position To Check Rotation | Video | Article |
| Belt High Check Point | Video | Article |
| Half Way Check Point Of Club Face In The Golf Swing | Video | Article |
| Club Positions Check for On Plane Swing | Video | Article |
| Keeping the Hips in Check on the Downswing | Video | Article |
| Belt High Check Point | Video | Article |
| Half Way Check Point Of Club Face In The Golf Swing | Video | Article |
| What Is The Pivot Point In A Golf Swing | Video | Article |
| What Is The Pivot Point In The Golf Swing Golf Tip | Video | Article |
| At What Point Should The Wrists Roll In The Golf Backswing Or Downswing | Video | Article |
| Low Point Bottom Out Swing | Video | Article |
| Check Your Balance To Stop Pop Up Golf Tee Shots | Video | Article |
| Check Your Current Golf Swing Hip Position | Video | Article |
| Checking Your Golf Finish Position To Check Rotation | Video | Article |
| Club Positions Check for On Plane Swing | Video | Article |
| Keeping the Hips in Check on the Downswing | Video | Article |
| 8 On Plane Swing Check Points | Video | Article |
| Check Your Current Golf Balance | Video | Article |
| Check Your Balance To Stop Pop Up Golf Tee Shots | Video | Article |
| Check Your Current Golf Swing Hip Position | Video | Article |
| Checking Your Golf Finish Position To Check Rotation | Video | Article |
| Keep Your Fairway Wood Head at Low Point Before Impact | Video | Article |
| YOUR GRIP |
|---|
| What Are The Key Grip Check Points To Hit Sweet Hybrid Golf Shots | Video | Article |
| Other Key Points Of The Golf Grip | Video | Article |
| Swing Golf Plane Drill 2 Grip halfway down shaft point butt of club at ball | Video | Article |
| Where Should The Grip End Of The Golf Putter Point During My Followed Through | Video | Article |
| Check Your Golf Grip When Hitting A Hook Shot | Video | Article |
| What Are The Key Grip Check Points To Hit Sweet Hybrid Golf Shots | Video | Article |
| Check Your Golf Grip When Hitting A Hook Shot | Video | Article |
| PRACTICE DRILLS |
|---|
| What are stable legs Golf Drill 4 Mirror check points | Video | Article |
| Key Points To Address With The Golf Set Up In Low Hook Shots | Video | Article |
| Credit Card in Right Hand to Check Face on Back Swing and Rotation | Video | Article |
| Credit card next to ball to check alignment, Golf | Video | Article |
| Golf Ball Flying Too Low – Check Ball Position | Video | Article |
| Credit card in back of glove to check setup, Golf Drill | Video | Article |
| Credit Card in Back of Glove to Check Impact Position | Video | Article |
| Right Hand Golf Tip: Try to Keep Club Face Open to Help Pitch Shots to Check | Video | Article |
| Credit Card in Right Hand to Check Face on Back Swing and Rotation | Video | Article |
| Credit card next to ball to check alignment | Video | Article |
| Golf Ball Flying Too Low – Check Ball Position | Video | Article |
| Check Your Divots To Help Correct Pushed Swing | Video | Article |
| Credit Card in Back of Glove to Check Top of Back Swing | Video | Article |
| Credit card in back of glove to check setup, Golf Drill | Video | Article |
| Credit Card in Back of Glove to Check Impact Position | Video | Article |
| Right Hand Golf Tip: Try to Keep Club Face Open to Help Pitch Shots to Check | Video | Article |
| Credit Card in Right Hand to Check Face on Back Swing and Rotation | Video | Article |
| Credit card next to ball to check alignment | Video | Article |
| What are stable legs Golf Drill 4 Mirror check points | Video | Article |
| Golf Ball Flying Too Low – Check Ball Position | Video | Article |
| Check Your Divots To Help Correct Pushed Swing | Video | Article |
| Credit Card in Back of Glove to Check Top of Back Swing | Video | Article |
| Credit card in back of glove to check setup, Golf Drill | Video | Article |
| GOLF QUESTIONS |
|---|
| What Are The Key Down Swing Check Points To Hit Sweet Hybrid Golf Shots | Video | Article |
| What Are The Key Putting Check Points In My Setup | Video | Article |
| What Are The Key Set Up Check Points To Hit Sweet Hybrid Golf Shots | Video | Article |
| What Are The Key Take Away And Back Swing Check Points To Hit Sweet Hybrid Golf Shots | Video | Article |
| How to Hit a Hybrid Golf Club, What Are The Key Impact Check Points | Video | Article |
| What Are The Key Alignment Check Points To Hit Sweet Hybrid Golf Shots | Video | Article |
| How Can I Use The Thomas Golf Alignment Guide To Check My Swing Positions In My Golf Follow Through | Video | Article |
| How Can I Use The Thomas Golf Alignment Guide To Check My Swing Positions In My Golf Take Away | Video | Article |
| How Can I Check The Distance From The Ball In My Golf Set Up? | Video | Article |
| How Can I Get My Golf Pitch Shots To Check On The Green More? | Video | Article |
| How Can I Use The Thomas Golf Alignment Guide To Check My Swing Positions In My Golf Follow Through | Video | Article |
| How Can I Use The Thomas Golf Alignment Guide To Check My Swing Positions In My Golf Take Away | Video | Article |
| How Can I Check The Distance From The Ball In My Golf Set Up? | Video | Article |
| How Is The Pivot Point In The Golf Swing Defined | Video | Article |
| Should I Aim My Large Breaking Putts To An Apex Point On The Golf Green | Video | Article |
| What Does It Mean If My Divots Point to the Left? | Video | Article |
| Where Should The Toe Of The Club Point Half Way Back On My Golf Back Swing | Video | Article |
| How to Hit a Hybrid Golf Club, What Are The Key Impact Check Points | Video | Article |
| On Plane Golf Swing, How Can I Check It | Video | Article |
| How Can I Use The Thomas Golf Alignment Guide To Check My Swing Positions In My Golf Follow Through | Video | Article |
| How Can I Use The Thomas Golf Alignment Guide To Check My Swing Positions In My Golf Take Away | Video | Article |
| What Are The Key Alignment Check Points To Hit Sweet Hybrid Golf Shots | Video | Article |
| What Are The Key Down Swing Check Points To Hit Sweet Hybrid Golf Shots | Video | Article |
| How to Hit a Hybrid Golf Club, What Are The Key Impact Check Points | Video | Article |
| On Plane Golf Swing, How Can I Check It | Video | Article |
Of course, once you have a video of your swing, you can use it to look at more than just your backswing. However, the backswing is what sets the stage for a quality downswing, so it would be a mistake to overlook the importance of this part of your technique.
— The Moment of Truth
For all of the analysis that goes on from start to finish in the golf swing, the club is only actually touching the ball for a fraction of a second on any given shot. The point of impact is the ‘moment of truth’ in that it dictates whether or not you are going to come away with a successful strike. You can’t look at impact alone when analyzing your swing, since what leads up to impact is going to dictate the position you can find, but it is important to take a look at your performance at impact to see if anything is noticeably wrong.
Assuming you have already taken some swing video as discussed above, you can use that same video for this section. Just pause the video when the club strikes the ball and evaluate what you see based on the following criteria.
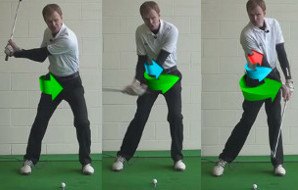
- Eyes down on the ball. This is a big one, of course, and it is probably the point you already know to look for at impact. You should be looking at the ball, not only because it is easier to hit something you can see, but also because keeping your eyes on the ball means good things for the rest of your technique. If you pull your eyes up out of the shot early, it’s likely that the rest of your upper body will come along for that ride. When that happens, the club is lifted up and you may hit the shot thin. So, make it a point as you practice to watch the ball intently all the way through impact. Only when the shot is on its way to the target should you feel free to look up and see where it is going.
- Lower body rotated through the shot. By the time the club makes contact with the ball, your lower body should already be turned through the shot and should largely be facing the target. This is an important point and one that is missed or simply not executed by many amateur players. If you can get your lower body to lead the way in your downswing, you’ll have the potential to develop significant power and lead the club into impact in a reliable manner time after time. It’s important to note that using your lower body to lead the way means it should be rotating hard in the downswing, not sliding toward the target. Many golfers make the mistake of sliding left instead of rotating, and those are two very different things. A lateral slide with the lower body will lead to poor balance and inconsistent contact with the ball. Teach yourself to rotate properly and a whole new world of quality ball striking may open up.
- Hands slightly in front of the ball. With most of your clubs – the exception being the driver, for some players – you’ll want to hit down into the ball at impact. To do that, you will need to have your hands just a bit in front of the ball at impact. You don’t want them too far in front, as that would lead to a particularly steep downward angle, a huge divot, and difficulty controlling your ball flight. However, you do want them slightly ahead of the ball, so you can easily get down through impact and send the ball on its way with authority. So, look for this point at impact to confirm that your hands are in a good spot. It’s easy to tell where your hands are just by looking at the angle of the shaft at impact. If the shaft is leaning slightly toward the target, you’ve done a good job. If not, you have some work to do.
If you find that something is going wrong at impact, you don’t really need to work on your performance at impact – you need to work on what you are doing prior to impact. Remember, the moment of impact is just a fraction of a second, so you can’t really make anything specific happen at that moment. Instead, make improvements to your backswing and the start of your downswing so what you need to do at impact will just fall into place naturally.
— Short Game Checkpoints
The good news now that we are in the short game section is this – it’s a lot easier to evaluate your checkpoints in the short game because things don’t happen nearly as fast. You aren’t trying to hit the ball very far in the short game, so you aren’t swinging hard. Whether it is a putt or a short chip, your swing speed will be limited, and you shouldn’t have much trouble checking on your performance.
With that said, the short game is still a challenging piece of the golf puzzle. You need to be precise when hitting short game shots, so you don’t really have much margin for error here. As you work on your technique, demand precision from yourself and make it a point to work out even minor errors until you get on the right track.
Let’s look at three key checkpoints for you to monitor within your short game.
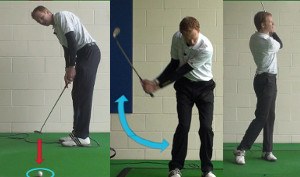
- Impact with the putter. Being in a perfect position at impact when putting is an attainable goal, since you aren’t swinging hard or moving your body much, but it will take some work to make that goal a reality. First, you need to make sure your head stays down, and your eyes are focused on the ball. Next, keep your weight balanced in the middle of your stance just as it was at address. Finally, make sure your hands are slightly in front of the ball at impact, which will help you achieve a clean roll. If those three points are in place – head down, balanced, hands in front – you’ll be on your way to many great putts ahead.
- End of the backswing on chip shots. Your chipping swing will have a transition just like the full swing, only it will take place much earlier in the backswing and will not be as dynamic. When you do reach the end of your chipping backswing, your wrists should be hinged, and your arms should have plenty of extension away from your body. With hinged wrists and extended arms, you’ll have everything you need to pop the club down into the back of the ball. Of course, as it virtually always the case any time prior to impact, you should have your eyes down on the ball at this checkpoint.
- Follow through on a greenside bunker shot. For an explosion shot from a greenside bunker, the follow through position is actually a good checkpoint to evaluate how you did during the swing. What you want to see here first and foremost is extension – you should have swung down through the sand aggressively to pop the ball up quickly out of the trap. Also, you should see that the club is elevated up out of the sand, indicating a full release with your right hand through the shot. Even though you are hitting a short shot, the follow through for a greenside bunker shot will be quite full, since it takes plenty of speed to move your wedge all the way through the sand and into the finish.
It will take some time to review the various checkpoints in your swing to see where any improvements can be made. That investment of time should pay off in the long run, however, as you’ll gradually be able to work the errors out of your technique and get on a path toward solid ball striking. We hope the information in this article is helpful as you work toward reaching your potential on the course. Good luck


