A simple credit card can actually help improve your golf swing. No purchase necessary.
This humble hunk of plastic makes a perfect tool for checking the position of your left (lead) wrist when setting up and swinging. If you have issues with keeping the clubface square during the swing – either opening or closing the face too much – this drill and the four that follow will tell you where the problem lies.
Obviously, any type of card will work (driver's license, membership card, etc.). For each drill, start by putting the card in place like this:
Now to check your setup:
If the card isn't connected all the way across, adjust your hand and wrist position so that it is. The drills that follow will show you how to swing while keeping the card in the correct place.
If when you can complete each drill successfully, you've got excellent hand and wrist coordination, plus proper arm rotation, throughout the swing. Give yourself a little, ahem, credit.
Credit Card in Back of Glove to Check Setup
There are plenty of important elements that have to come together just right if you are going to be a successful golfer. You have to make a quality backswing, you have to transition the club beautifully from backswing to downswing, and you have to rotate through the shot nicely on the way down. However, before any of that can take place, you need to build a solid setup position. Getting set up in a solid position over the ball is one of the key fundamentals in the game, yet it is a point that many amateur golfers overlook. If you are willing to take the time to focus in on improving your setup from top to bottom, you will be a big step ahead of your competition on the course.
The position of your hands is one of the key elements of the setup, as the way your hands connect to the club will have a lot to do with the outcome of your shots. Unfortunately, many average golfers put their hands on the club incorrectly, leading to disappointing results. If you are going to get the best possible return from your swing in terms of performance on the course, you need to make sure your hands are doing their job - both at setup and throughout the swing. It might be somewhat boring to spend time on the driving range working on the positioning of your hands at address, but this is work that will pay off in the long run.
In this article, we are going to look at the way in which using a credit card in the back of your glove can actually help you to position your hands perfectly at address. That's right - we will be using a credit card to help improve your game. Most people think about buying new clubs when they think about using their credit card to play better golf, but we are taking a different approach. Using that small piece of plastic that you carry around in your wallet as a makeshift training aid, you will be able to quickly and easily analyze the current state of your hands in the setup. Once you see if there are any problems present with your setup, you can make the necessary corrections and hopefully get your game back on track as quickly as possible.
As you already know, there are plenty of golf training aids on the market today, but this drill is a nice option because you won't need to buy anything in order to get started. You certainly already have a credit card of some kind, or even a driver's license or membership card to the gym - anything along those lines will work nicely. The best golf drills are the ones that are free to perform, and this one falls into that category. Don't invest in expensive training aids when you can do smart, effective drills like this to move your game in the right direction.
All of the instruction below is based on a right handed golfer. If you happen to play left handed, please take a moment to reverse the directions as necessary.
The Importance of Hand Position
Before getting into the specifics of how to perform this drill, we are first going to look at exactly why it is crucial to have your hands in the right spot at address. If your hands are out of position when you start your swing, there is a good chance that they will still be out of position when you return to impact - and that will lead to trouble. To make things as simple as possible - which is always a good thing in golf - you want to make sure that your hands start the swing in the same position that you would like them to reach at impact.
If your hands are too far ahead of the ball when you take your stance, a number of problems could occur. First and foremost, you will be very likely to make a steep downswing, causing a deep divot and usually a loss of distance. Unless you have a specific reason for wanting to hit down aggressively on the ball, such as when you have a bad lie, you will need to avoid this kind of pattern if you hope to hit solid shots regularly. Also, putting your hands too far ahead at impact can easily lead to a narrow backswing, and a narrow backswing is one of the leading causes of the slice. If you are someone who struggles to get rid of your slice during most rounds, you might want to look at hand position as a possible culprit. Believe it or not, making an adjustment as simple as moving your hands back into a more neutral position could go a long way toward eliminating your slice.
On the other side of the coin, having your hands too far back when you take your stance can also cause a variety of issues. When your hands start the swing from a position that is behind the golf ball, it will be easy to hit the shot fat when you get back to impact because the club head won't quite reach the position of the ball before it strikes the turf. This is a problem with any club in your bag, but it can be particularly troublesome with the short clubs. If you are getting tired of consistently hitting the ball fat even from nice lies in the fairway, be sure to check on your hand position to ensure you aren't setting up with them behind the ball.
Another potential problem which can develop when you start with your hands behind the ball is a short backswing. Making a full, long backswing away from the target is one of the biggest keys to hitting quality shots, but your ability to do just that may be limited by poor hand position in this case. Keeping your hands back behind the ball is likely to hurt your rotation overall, and your swing will be less powerful as a result.
So, if you don't want your hands too far ahead or too far behind the ball, it should be obvious where they need to be at setup - right over top of the ball, or just slightly in front. Again, it all comes down to where you want your hands to be at impact, and that point is going to vary from shot to shot and club to club. For instance, when hitting a driver from the tee, you can go ahead and set up with your hands just barely behind the ball, since you want to hit that kind of shot on the upswing. On the other hand, when hitting an approach shot out of the fairway with a pitching wedge, you want to set up with your hands a couple inches in front of the ball in order to promote a slight downward hit.
Putting your hands in the right position before starting your swing is critical, but fortunately, it doesn't have to be that difficult. If you are willing to put in a bit of time and effort on this point, with some help from the drill we are going to lay out below, you should be able to consistently get your hands in just the right spot time after time.

Performing the Drill
It's time to get down to business. Now that you understand exactly why this is an important point, you can get to work on performing the drill in order to solidify the hand position that you are going to use when you get out onto the course. It is important that you pay attention to the steps below in order to perform the drill correctly. You will only achieve the desired results if you are actually able to do the drill in the right fashion, so attention to detail certainly counts in this case. Follow the step by step plan below and you will be well on your way.
- For starters, you don't actually have to be at the driving range in order to perform this drill. You aren't going to hit any shots during the drill itself, so this can just as easily be done at home or anywhere you have space and time. Of course, if you are able to do it at the driving range, you can follow up the drill by hitting some shots immediately afterwards, which might be a nice way to reinforce what you have learned.
- While you can technically do the drill with any club in your bag, using one of your mid-irons is a good option because it will give you the feel of a 'long' club with the control of a shorter one. Of course, you can work through your bag and do the drill with a number of various clubs if you would like. In reality, the club that you use isn't all that important in the context of this drill. In addition to a club, you are going to need a golf glove and a credit card (or another, similar plastic card).
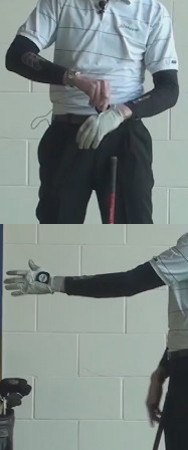
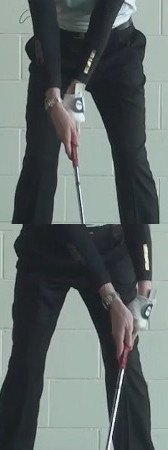
- To begin the drill, put your golf glove on your left hand - but don't tighten it down into place just yet. You should leave the back of the glove open so that it is loose around your hand yet pulled all the way onto your fingers. At this point, take the credit card with your right hand and slide it into the back of the glove. The card should be positioned so that the long side is running down your arm, and the middle of the card should roughly be aligned with the crease on the back of your wrist. Once the card is in the right spot, you can go ahead and close your glove and secure it in place. When you do so, the credit card should be 'locked in', and it should be stable even as you move your arm and hand around.
- With the card in place and your glove secured, pick up your club and get into your stance. You should pretend that there is a golf ball down on the ground in front of you, and you should be addressing that imaginary ball just as you would any other shot that you play. Now that you have your address position, the drill will actually be completed, and you can observe the results to check on the quality of your hand position over the shot.
As you stand over this imaginary shot with the credit card in the back of your glove, you are going to observe the connection between the credit card and the back of your left arm in order to decide if your hand position is on track. There are three potential outcomes for this drill, and each tells you something different about your setup. The three outcomes that you may experience are listed below -
- Card is flat against the back of your wrist. This is the outcome that you should be hoping for, as the club resting flat against the back of your wrist indicates that your hands are in an excellent position. Your wrist must be relatively flat in order to wind up with this kind of result, so you should feel good about what you are doing with your setup when this is the case.
- Top of card is off of your wrist. When the top of the credit card is up off of your wrist and pointing out into the distance, you will know that your hands are too far in front of the ball at address. Your wrist needs to be in a bowed position in order to create this outcome, which is only going to happen if you have pressed your hands forward significantly in front of the ball. Obviously, you will want to adjust your hands back to the right when this is the case so you can reach a position where the card is flat against your wrist.
- Middle of the card is off of your wrist. This is the opposite of the previous point. If the ends of the card are touching your hand/wrist but the middle is not, you are in a cupped position and your hands are almost certainly behind the ball. This is probably the worst of the three possible outcomes in this drill, so you will want to be sure to move your hands forward as quickly as possible to rectify the problem.
Part of the beauty of this drill is its simplicity. There isn't much required of you in order to perform the drill, and the results are easy to evaluate. Plus, once you do figure out if there is a problem with your setup, you should be able to solve that problem with just a slight movement of your hands in one direction or the other.

Making Adjustments
Obviously, the adjustments that you have to make after completing this drill are going to be relatively straightforward. Hands are too far back? Move them forward. Hands are too far forward? Move them back. It doesn't take an experienced golfer to make these changes, so you will be able to handle that part of the job with no trouble at all. However, things get a bit trickier from there, as is usually the case in the game of golf.
After you adjust your hand position, you are going to need to make some other adjustments within your swing technique in order to optimize your ball striking. Almost certainly, the changes that you make with regard to your hand position are going to greatly impact how the ball flies through the air, so it will be up to you to make changes as you see fit in order to produce the kind of ball flight you desire. Unfortunately, those changes are going to be so unique and personal that they can't possibly be listed here - every golfer is different, and every swing is a complex set of mechanics that has to be treated individually.
If you are struggling to produce nice ball flights after you change your hand position, consider enlisting the help of a teaching professional to get things in order. A good teaching pro will be able to offer advice on how you can use your new and improved hand position to create excellent shots time after time. Even if you only take one or two lessons with a local pro, the advice that they are able to offer may be enough to lead you to a future of better shots and lower scores.
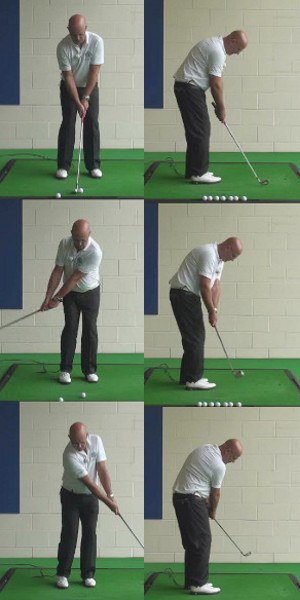
Short Game Hand Position
It is always a mistake to forget about the short game, and that certainly applies when thinking about hand position. This point is just as important when playing short shots as it is when making full swings, so don't forget to work on your hand position with the short clubs as well during one of your upcoming practice sessions. If you are a player who has long struggled on and around the greens, taking a big step forward might be as simple as correcting a slight mistake in hand positioning.
For putts, the matter of hand position is simple - you want to have your hands just barely in front of the ball at address. Many putters even take care of this point for you, buy building a little bit of offset into the design of the club. When you setup with your hands just barely in front of the ball, you will have a good chance to get the ball rolling as quickly as possible - which is essential for hitting consistent putts. It is common for many golfers to have their hands behind the ball at address when putting, which causes the ball to bounce and skid as it leaves the putter face. If you can steer clear of this mistake, you will be served well on the greens.
When you get off the green and start chipping, things get considerably more complicated. For a basic chip shot, you are going to again want to set up with your hands slightly in front of the ball. However, if you are chipping from a bad lie, you will want to move your hands even farther forward to promote a downward hit in order to catch the ball as cleanly as possible. On the other hand, if you are chipping from a good lie and want to hit the ball high, it will be necessary to move your hands back in order to add loft to the shot at impact. For sand shots, set your hands just slightly behind the position of the ball in order to permit the club head to enter the sand before it makes contact with the golf ball itself.
As you can see, hand position gets a bit complicated in the short game when you get off the green and start pitching and chipping. With that in mind, the best thing you can do is practice as much as possible. By working on your short game on a regular basis, you will get more and more comfortable with how hand position affects your shots. Feel free to experiment as well as you work on your short game. How does a particular shot come off if you move your hands forward, or back? By testing out different methods in the short game, you are sure to find some winning combinations of club, swing, and hand position.
The 'credit card in the glove drill' might be simple, but it certainly is effective. If you can take some time in the near future to put yourself through this basic drill, you are going to learn quite a bit about your setup and how it can be improved. Rather than always trying to change the way you actually swing the club in order to get better, the more-successful approach is often to adjust other things about your game in order to produce better results. Good luck with this drill, and play well!


