The fat shot may not be the worst mistake in golf – that distinction belongs to the dreaded shank – but it can certainly wreak havoc on your game.
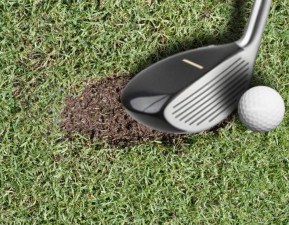
To hit the ball “fat” means simply to hit the ground behind the ball, causing the clubhead to lose speed as turf gets between the clubface and ball. You lose considerable distance, and the farther behind the ball you strike, the shorter the shot will fly. Fat shots often end up in trouble short of the target, such as greenside bunkers or water hazards.
While it's possible to hit a fat shot with any club, even when the ball is teed up, it happens most often when using an iron. It's generally easy to tell when you've hit the turf first – you'll feel and hear a “thud” instead of the crisp sensation of contact with the clubface.
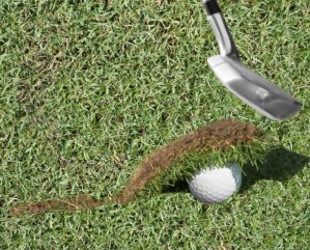
If you're not sure whether you've hit a shot fat, there's a visual clue to look for. On a properly struck shot, the divot will start directly beneath or slightly in front of where the ball was sitting. Hit it fat and your divot will start behind the ball's original spot.
If you encounter a spell of fat shots, it's best to find an all-grass driving range to work on the problem. When you hit behind the ball on a synthetic-turf mat -- the kind featured at many ranges -- the club tends to skid or slide into the ball, making it tough to tell exactly where the clubhead struck. Fat shots hit from mats often fly just as far as those struck well.
The tips and drills featured in this series are designed to cure the different causes of fat shots. You're bound to find help in the text and video lessons which follow.
Fat Shot Golf Drills
Hitting the golf ball fat is an extremely frustrating mistake to make. As soon as you make contact with the ground, you know that the shot is going to come up short of the target – you really don't even need to look up to see where it is going. The feeling of hitting a fat shot is unmistakable to the experienced golfer, and even the beginning player will become familiar with it soon enough. It should go without saying that your game will benefit if you can take fat shots out of the picture to the greatest extent possible.
Of course, that is a job which is easier said than done. It is easy to hit the ball fat, just as it is easy to hit the ball thin. Golf is a hard game, and accomplishing a clean strike is one of the toughest tasks that you will face. It is so difficult, in fact, that no golfers are able to achieve a clean strike on 100% of their shots. Even the best golfers in the world catch the ball fat from time to time. Rather than striving for perfection – which is unattainable – you should simply be working to get a little better each time you head out to the course.
In this article, we are going to offer up a series of drills which we hope will help you reduce the number of fat shots you produce. These drills are easy to perform at the driving range, they don't require any specialized equipment beyond what should already be in your bag, and they are designed to correct common mistakes which lead to fat shots. Even using these drills for just a few minutes at the start of a practice session can go a long way toward taking the fat shots out of your game.
So what exactly is a fat shot? That is an important question to answer before we get into the drills. Any experienced golfer will know what we mean when talking about fat shots, but newer players may not be familiar with the term. Basically, if you hit the ground prior to hitting the ball, you have hit a fat shot. So, for example, when hitting an iron shot from a fairway lie, you are trying to hit down on the ball in order to catch the ball first, followed by the turf. The divot you take out of the ground should come after the ball has already been struck. If that happens in reverse, with the turf being contacted before the ball, a fat shot will be the result. Some golfers will joke that you have hit the 'big ball before the little ball' – the 'big ball', of course, referring to the earth, and the 'little ball' being the golf ball. The club will lose speed prior to impact when you hit a fat shot, and the quality of contact will be diminished. Both of those factors will lead to your shot traveling a shorter distance than planned.
All of the content below is based on a right-handed golfer. If you happen to play left-handed, please take a moment to reverse the directions as necessary.

Feet Together Drill
To get started, we are going to explain how you can use the 'feet together drill' in order to establish a baseline for your ball striking. Often, when trying to improve one specific area of your game, the best thing you can do is to break down your game into smaller components before putting it back together again. That is basically what we are going to be doing with this drill.
For this drill, you are going to want to be at the driving range with your set of clubs and some practice balls to hit. You won't need any other equipment for the drill, so this is a great one to integrate into your existing practice routine. Follow the steps below to perform the drill.
- Pick out a club and a target to get started. For the club, you should consider starting with a short iron. The short irons are some of the easiest clubs in the bag to hit, so this choice should allow you to have some early success while getting used to the drill. Once you have gotten comfortable with the drill procedure, you can feel free to move on to other clubs as you wish. As far as a target is concerned, it is always important to pick a target on the range anytime you are practicing your swing. Golf is a target game, and each shot you hit is a chance to improve your ability to hit a target. However, since you are going to have your feet together during this drill, you aren't going to be able to hit the ball as far as you would normally. With that in mind, pick a target that is significantly closer than one you would pick when making a traditional swing with your normal stance.
- Create your stance. As mentioned above, you are going to have your feet together when performing this drill. To wind up in such a position, you are going to start with your standard stance. Focus on the target you have picked out, build your stance, and get ready to swing just as you would out on the course. However, before you actually start your swing, you are going to bring your feet in close to each other. They don't necessarily have to be touching, but they should be within a few inches of each other. You should still be balanced, and your knees should be bent slightly. Once you feel comfortable with this narrow stance, you will be ready to start the drill.
- Making a swing. Now that you are all setup, the only thing left to do is swing the club. Of course, you won't be able to swing it in your normal fashion, as you aren't going to have the same kind of strong base that you have when your feet are at their normal width apart. For this first shot, only make a small swing with the club reaching about halfway back through the backswing before starting forward. The only thing you should be focused on during this swing is clean contact. Don't worry about how far the ball is going to go, or even in which direction it is going to travel. Just do your best to make solid contact at impact.
- Continue on. As you continue to hit some additional shots with this drill, you might find that you are gaining confidence and you're able to make slightly bigger swings. Trust your feelings and work on striking the best-possible shots while remaining in this narrow stance. Continue the drill as long as you like before returning to your normal swing.
The big lesson that should be learned from this drill is that you don't need to move side to side in order to hit solid shots. Countless amateur golfers sway during their swings, and the quality of their ball striking suffers as a result. Specifically, if you sway to the right during your backswing – away from the target – you will very likely hit the shot fat. You won't be swaying during this drill, because your narrow stance won't allow it. Once you move back to your regular stance, keep this lesson in mind and do your best to avoid any notion of a lateral slide. Adding this simple drill to your regular practice routine should go a long way toward reducing the frequency of your fat shots.
Tee Behind the Ball Drill
Some of the best drills in golf use a visual component to change the way you approach a particular shot. In this drill, we are going to use a tee as a visual aid to make sure you are trying to strike the ball properly. It is easy to fall into bad habits as your golf experience moves along. With this drill, we should be able to snap you out of at least one of those bad habits in short order.
The bad habit we are focused on with this drill is the urge to 'help' the ball up into the air. Many golfers feel like they need to scoop the ball up at impact in order to send it high into the sky. This simply isn't true. Your golf clubs have loft for a reason – they are designed to hit the ball into the air. All you need to do is swing through impact on a level or slightly downward plane in order for the ball to rise up into the sky beautifully. If you try to scoop the ball up instead, you will almost certainly hit your shots fat.
This drill is going to help rid you of this bad habit. Please follow the steps below to give this a try for yourself.
- You will need to be practicing at a driving range which offers a grass hitting area, rather than artificial turf. You will also need some practice balls to hit, a few golf tees, and some short irons.
- Find a spot on the range to use for your practice session and work on getting setup for the first shot. You will want to pick out one of your short irons to use first – a nine iron is a great pick, but you can use any of them effectively. Once you decide on a club, you will need to pick out a target on the range that can be used for the shots. Naturally, this target should be located at a distance which is appropriate for the club you are using. Place the first golf ball down in front of you and get ready to swing.
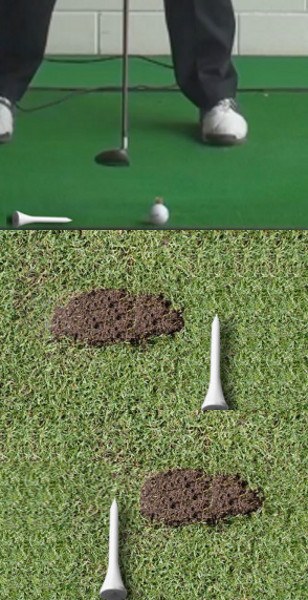
- Before actually hitting the first shot, however, you are going to do one more thing. Take one of the golf tees and push it down into the turf, directly behind the ball. The tee should be approximately one inch behind the ball, and it should be pushed all the way down so that the top of the tee is flush with the top of the turf. You should be able to see the top of the tee from your address position, but it should not be sticking out so as to interfere with your swing.
- It is now time to hit the first shot. You aren't going to do anything out of the ordinary with your swing from a technical standpoint – you are just going to do your best to hit a solid shot at the target you have selected. However, you are going to change your mental approach during the swing. While the club is in motion, focus on swinging down over top of the tee that you have placed in the ground. The idea is to swing down just over the top of the tee and down into the ball nicely. You won't be able to scoop your shots if you do a good job of swinging down over the tee. Once the shot has been struck, you will be able to check the location of your divot in relation to the tee to confirm that you have done a good job. If you wiped the tee out on the way through, you will know that your swing bottomed out too early.
- Feel free to hit as many shots as you would like using this drill. Of course, since you are going to be taking divots out of the turf, you'll need to keep moving the tee in order to continue on while playing from a good lie. To minimize the damage you do to the practice area, try to gradually move back in a straight line so you only take up one long strip of turf.
The beauty of this drill is how well it applies to your game out on the course as well. Once you have used this during a couple practice sessions, you will easily be able to picture the tee in the ground – even if it isn't actually there. When on the course, imagine that you have placed a tee in the ground behind the ball and then do a good job of swinging over it on the way down into impact. Sure enough, swinging down in this manner is going to all but eliminate your fat shots.

Hold Your Finish
To wrap up our list of three drills, we are going to highlight one which is about as simple as it gets. There isn't anything needed for this drill other than your usual golf equipment, and it won't look like you are doing anything other than practicing as normal. However, despite its simplicity, this is one of the best things you can do in an effort to eliminate your fat shots.
For this drill, you will want to head to the driving range and set yourself up for a standard practice session. You'll want to have your entire set of clubs, and you will want to set up in a place which will allow you to hit every club from the driver on down to the wedges. Unlike other drills, where you may hit a few shots while using the drill before going back to your normal swing, you are going to use this drill for the entire practice session.
To get started, simply pick a club, select a target, and hit your first shot. You aren't going to do anything at all different during your swing. The drill requires you to simply hit shots as you would during any other time on the range or on the course. So what is the drill, exactly? It involves your finish position. Specifically, the task is to hold yourself in a balanced finish position until the ball comes back down to the ground. You will watch the ball sail through the air, see it land, and then let yourself reset for the next swing.
This drill is going to accomplish a couple of things. First, it is going to require you to focus on your balance, which is always a good thing. If you aren't balanced properly, you won't be able to hold your finish all the way through until the ball hits the ground. Also, the drill is going to demand that you get all the way through the shot and onto your left side. This is the big point with regard to avoid fat shots. Many golfers who hit the ball fat get stuck on their right side and never manage to move their body through the ball properly. This causes the club to bottom out prematurely, and their shots are hit fat again and again.
You won't be able to get away with this mistake while paying attention to your finish position. If you are nicely balanced on your left leg at the end of the swing, you will most certainly have gotten through the ball properly. That doesn't guarantee that you won't hit the ball fat, but it is a good starting point. Not only can you use this drill during your practice sessions, but you can use it out on the course as well. Get into the habit of holding your finish until the ball lands and you will be able to avoid fat shots most of the time.

Closing Thoughts
We have offered up three drills which will help you steer clear of fat shots moving forward. Before we finish, we would like to provide you with a few final thoughts on the topic of fat shots.
- Beware of too much right hand. If you continue to have trouble with fat shots out on the course, make sure you aren't allowing your right hand to become too active in the downswing. Letting your right hand get involved prematurely is a sure way to hit the ball fat, as you will be forcing the club down into the turf before it has time to reach the point of impact. Let your left hand pull the club down toward the ball while the right hand mostly goes along for the ride.
- Don't get in a rush. Hurrying through your swing is another way to create fat shots. When you rush, your arms and the club move too fast and the rest of your body is unable to keep up. As a result, you aren't able to clear your lower body or torso through the shot, and you will stick the club in the ground before you reach the ball. If you know that you have a habit of rushing in your swing, take a moment to take a deep breath in and out before you take your stance and make a swing. Something as simple as a deep breath can go a long way toward slowing you down and putting you in a good frame of mind to hit a shot.
- Move the ball back when playing on soft turf. If the ground is relatively soft under your feet, consider moving the ball back just an inch or two to make it easier to achieve clean contact. Hitting the ball even slightly fat from a soft lie will result in an ugly outcome. To avoid catching any ground at all before you hit the ball, move the ball back a bit and make sure you stay perfectly balanced throughout the swing. You might wind up sacrificing a bit of distance this way, but that is a trade worth making if it means you can hit the ball cleanly.
You aren't going to be able to reach your goals in this game if you consistently hit the ball fat. Sure, everyone will hit a fat shot from time to time, and that isn't anything you should worry much about. Fat shots are only a problem when they become a pattern. If this issue is plaguing your game at the moment, we hope the drills offered in this article will be of some assistance. Good luck!


