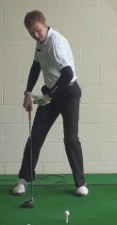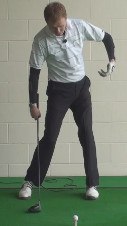
To generate power and clear the way for the arms and club, the hips must move toward the target on the downswing. More specifically, they must rotate rather than slide laterally.
If the hips fail to turn sufficiently, the arms and club will get “stuck” behind the body, causing weak shots to the right or, if the golfer tries to compensate by flipping the hands, to the left. If the hips slide rather than turning toward the target, the arms will lag too far behind and produce similar results.
Think about the throwing motion of a baseball pitcher. After winding up, a right-hander plants his left foot and pivots the hips around it, with the torso, shoulders and arms following in sequence. The golf swing is basically an upside-down version of the pitching motion.
Watch a star golfer like Rory McIlroy or Tiger Woods through the impact area. You'll notice the left knee lock with a snapping-like action and the legs stop rotating just as the club is moving into the ball. This move quickens the pace of the right hip, prevents sliding and generates enormous power.

This left knee snap isn't the easiest move to master, but it can seriously boost your driving distance. Give it a try, first by making some light swings with no club. As your hips rotate into a square position (relative to the target line) and the shoulders/arms move into impact, gently snap the left knee straight and continue through the swing. The knee shouldn't go completely stiff, just straight enough to halt its movement.
Progress to swings with a club, then give it a shot on the range. Start out making easy swings with a mid-iron and work your way to longer swings and clubs.
Remember to keep your right side driving toward the target as the left side slows down.

More Power Drills Like Snap Front Knee at Impact
Power is something that every golfer would like to add to their game. It is great to be able to hit the ball straight at your target on a consistent basis, but it is even better if you can do so while hitting the ball hundreds of yards down the fairway. The combination of power and accuracy is rare in golf, but it is something that every player strives to achieve. When you are able to hit the ball both long and straight, there will be almost no limit to what you can accomplish on the course.
With that in mind, it would be helpful if you had a few different power drills at your disposal that you can work on when you visit the range for a practice session. Many golfers simply head to the driving range and swing away, hoping to magically get better without really having any sort of plan. Not surprisingly, that method tends to fail more often than not. Instead, you should have a very specific plan in place for your long term improvement, and then you can go about the process of executing that plan during each practice session. As far as power goes, using drills is a great way to teach your body how to accelerate the club head more aggressively through impact. Even without making yourself physically stronger, you can add distance to your shots by making improvements to your basic technique.
Working on your power presents you with a delicate balance that needs to be achieved. You want to add power to your swing, while not doing anything to hurt your ability to hit the ball straight. It is essential to be able to control your golf ball, as hitting shots that are long but also off line is a recipe for disaster. Length is only useful when you also have control, so work hard to balance those two interests to the best of your ability. If you feel like a particular power drill is hurting your fundamentals and causing you to lose control over the ball, it would be best to pass on doing that drill. Only work on things in practice that will further your progress toward the goal of having both power and control.
The content below contains four power drills that you can use in an effort to gain club head speed in your swing. You might find that all four drills help you make progress, or you may find that only one or two really benefit your game. Work through them patiently one by one at first, and then keep doing only the ones that you feel are productive. As with anything else in golf, progress can be slow to come when using these drills, so don't give up on them too quickly – give each one a chance to work before you move on to the next.
All of the content below is based on a right handed golfer. If you play left handed, please reverse the directions as necessary.

Drill #1 – Snap Front Knee at Impact
Using the word 'snap' in golf instruction is usually not a good thing. After all, the golf swing is supposed to be a smooth, fluid motion – so snapping generally has nothing to do with making a good swing. However, in this context, you can use the word snap to refer to the motion of your left leg as the club moves through the hitting area. Obviously, your leg should not actually snap, but rather straighten up rapidly in the moments before impact. If you can straighten your right leg aggressively prior to hitting the ball, you may be able to squeeze a few extra miles per hour out of your swing.
This is a move that you will see made by some of the professionals on the PGA Tour. When executed correctly, snapping your left knee straight at impact is a good way to create a little more room in your swing – and more room generally means more acceleration. As you might imagine, this is not an easy move to make, and it is one that will require great timing in order to execute correctly. If you are even just a little bit off when you try to straighten your left leg near impact, you can cause a total miss-hit of the ball.
To work on this technique, head to the driving range with a bucket of balls. The best way to get started is to work on hitting some half-speed shots at first, before gradually picking up the pace as you go. Once you get the hang of how you can snap your left leg into position at impact, you can move your way up to longer and longer clubs with bigger and bigger swings. Eventually, you will get to the point where you are hitting your driver at maximum effort. Don't rush yourself to get there, however – take your time and only speed up your swing when you are sure you are comfortable with the timing involved in this move.
As the club starts to swing down toward the ball, your lower body is going to be begin to turn to the left to make room for the rest of the swing. The snapping of your left leg into position should happen simultaneously to the rotation of your lower body. You don't want to try to complete one move before executing the other – you want them to happen together. The swing you wind up making needs to look fluid and connected, which will not be the case if you cut up your technique into too many pieces. The move of snapping your left leg straight right at impact is only going to work if you can time it up to match the rest of your body rotation through the shot.
It is important to understand before you try this move that using this technique could be hard on your left knee, or other parts of your body. Plenty of pro golfers have run into knee problems after years of swinging the club in this manner, so be careful to avoid putting too much stress on one specific joint. There are lots of ways to swing the club, so feel free to move on to other techniques if this one starts to cause you any kind of pain. Also, be sure to give this method plenty of practice time on the range before you take it out onto the course. You will find that it is a little bit more difficult to make solid contact while using this technique than it was with your old swing. Only practice time will make you more effective, so hit plenty of balls and watch your progress closely all along the way.

Drill #2 – Pause at the Top
When you think about putting power into your swing, you probably don't think about slowing your swing down. If anything, you are going to try to speed it up in order to generate as much power as possible heading through impact. There is a big problem with that theory, however – the only time the club needs to be moving fast is at the bottom of the swing. Other than that, the club is free to take its time and gradually build speed. As long as you are ripping through impact with plenty of speed, the rest of your swing can be slow and methodical.
It is actually the players who swing the club slowly throughout the rest of the swing that often have the most power. Why is that? Most likely, it is because their slower swing tempo allows them to keep everything working together nicely leading up to impact. The golf swing isn't about pulling your arms through the hitting area as quickly as possible. Rather, it is about having your whole body work together to generate speed. Players who take enough time during the early parts of the swing to get their body in the right position will be rewarded by having plenty of power to call upon later in the motion. If you were to rush through the initial stages of your swing, you might not be 'organized' enough to really turn it loose at the bottom.
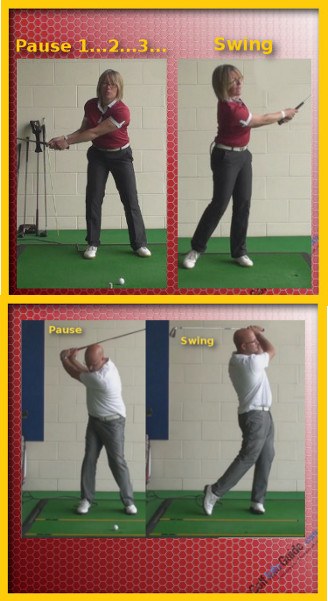
With that in mind, the 'pause at the top' drill is a great way to learn how to get your entire body working together toward the same goal. This is an excellent drill for the driving range because it will require you to slow down and really think about your swing technique. It is easy to get caught up in the fun of just hitting shot after shot on the range, but that is a method that won't really make you a better player. During your next visit to the driving range, try using the drill outlined below to improve both your power and the consistency of your swing.
- This is a drill that you should do while making practice swings – it is not a good idea to hit actual shots while doing this drill. A good way to set up your practice session is to alternate between hitting a shot and making a practice swing using the 'pause at the top' method. It will take your twice as long to go through your bucket of practice balls this way, but you will get more out of your time than a normal range session.
- For the practice swings, you are going to make your normal backswing, only instead of transitioning into the downswing, you are going to pause and hold your position at the top. When you pause, check your body positions to make sure everything is in place and ready for the downswing. Specifically, are you on balance? Is your left foot still flat on the ground as it was at address? Have your kept your eyes down on the ball? If you can answer 'yes' to these three questions, you have likely done an excellent job in your backswing.
- After pausing for a few seconds, finish the rest of the practice swing all the way up into a full finish. Now that you have done one practice swing, go ahead and hit a regular shot. After that shot, return to another practice swing. Repeat this process over and over until you are finished with your bucket of balls.
As you work through the practice session, you should notice your ball striking gradually start to improve as you go. With more and more reps of the 'pause at the top' practice swing under your belt, you will get a better and better feel for the correct positioning of your body. With your body in a great spot at the top, you can now attack the ball freely while being confident that you are going to hit your target line.
The great thing about this drill is that you can actually do it on the course just as you did it on the practice range. When you feel your timing or positioning start to get out of whack, take a moment to make a couple of these modified practice swings. Hopefully, a reminder of how to position your body correctly throughout the swing will get you right back on track.

Drill #3 – Left Arm Only
It is pretty natural for most right handed golfers to use their right arm aggressively in the downswing. Since your right hand is dominant, you probably feel comfortable using it to attack the ball and provide speed for your swing. While there is nothing wrong with that, you aren't going to get the most out of your swing unless you are able to use the left arm along with the right. To help you maximize the effect of your left hand on the club, this drill has you swinging the club with only your left arm (and the rest of your body). By taking away your right hand for this drill, you will lose that 'comfort zone' and you will be forced to find other ways to move the golf club.
Just like in the previous drill, this is a drill that is best done with practice swings only. Hitting balls with just one hand on the club can lead to shanks and plenty of other ugly outcomes, so stick to 'dry' practice swings and put both hands back on the club when you are ready to hit some actual shots. You can use this drill for just a few minutes on the range, or you can dedicate an entire practice session to working on this concept.
The key to success when making practice swings with just your left arm is using the rest of your body to support the swinging motion. Specifically, you should be making a great shoulder turn which will help you get the club into position at the top of the swing. As a right handed player, your right hand and arm likely have more power than your left. Therefore, your swing will feel 'weak' when you use only your left arm. To create speed even with just that one hand on the club, it is essential that you make a full shoulder turn away from the target. With your back to the target at the top of the swing, you will be free to turn it loose on the way down. It is actually possible to generate quite a bit of speed at the bottom of the swing with this drill when you probably engage your body.
When you go back to making regular swings after doing a few left hand only swings, remember the feeling of using your body to generate power. That motion should not change even after you put your other hand back on the club. It is the combination of a great shoulder turn and the aggressive swing of your right arm that will allow you to maximize your power potential once you get back out onto the course. It is possible to hit decent shots while only using one or the other (right arm or full turn), but hitting great shots will require a combination of the two.

Drill #4 – Letting It Fly
Sometimes, the best way to practice hitting the golf ball a long distance is simply to try hitting the ball as far as you can. That might sound simple – or even stupid – but when was the last time you really tried to air it out? Most golfers swing hard, but they stay well within their limitations so as to hit the ball as straight as they can. It is hard to talk yourself into swinging at 100% effort while on the course because you don't want to lose a golf ball or incur any penalty shots. However, on the driving range, you should have plenty of room to let it fly. You still need to be careful, of course, so work on picking a target line at the range that will leave your ball safely on the range even if you get a little wild.
To start, head to the driving range and pull your pitching wedge from the bag. You might be tempted to start with the driver right off the bat, but it usually isn't a good idea to swing your longest club at the start of a range session. With your pitching wedge in hand, pick out a target that would normally be within comfortable range for that club. Once you find a target, hit five balls, trying to hit them over the target each time. This will require not only an aggressive swing, but also solid contact. It will likely be a strange feeling to swing all out at your pitching wedge, but this will be a good lesson to learn when it comes to adding power to your swing.
As you go through this drill, it is important to understand the boundaries for your swing. While you should be swinging at max effort, that doesn't mean that you are going overboard. A max effort swing should be considered the hardest swing you can make while still staying on balance. If you have to fall off balance to make your swing, then you have gone too far. Keep adding speed and effort to your swing until you start to lose your balance, and then back off just a bit. You can't play good golf without good balance, so there is no point in crossing that line.
After hitting some shots with your wedges, gradually move your way up through the bag. Hit a shot or two with each club, and see how far you can hit them. Don't worry too much about accuracy at this point. You can still pick a target and do your best to hit it, but the idea is to simply launch the ball down the range with plenty of freedom and confidence in your swing.
Eventually, you will arrive at your driver. When hitting your driver at full effort, remember to make a long enough golf swing to build speed gradually. Even though you are going all out, you still need to maintain tempo and rhythm in your motion. It is tempting to rush through your driver swing when you want to hit one as far as possible, but that would be counterproductive. A powerful driver swing is a long one, so give yourself plenty of time to get all the way through the ball.
This last drill should help you find the right mindset for unlocking hidden power in your game. By suing the last drill, along with the other three, you should be able to move your ball out there farther than ever before. While golf isn't all about distance, having the ability to blast a long drive or reach a par five in two is certainly an advantage. Work on putting together the combination of power and accuracy that every golfer is looking for and you will be on your way to playing some memorable rounds in the near future.


