Golfers who struggle on the greens will try anything to fix their putting. They'll change their stance, their stroke, and often the putter itself. The first step for many is to try gripping the club differently.
The cross-handed or “left hand low” grip is usually the first stop. Some players, such as Bernhard Langer, invent entirely new methods for holding the putter. In recent years, the so-called “saw” or “claw” grip has come into vogue thanks to golfers including Sergio Garcia, Chris DiMarco and Mark Calcavecchia.
What's the benefit of the saw/claw grip? It's designed to prevent the right wrist (for a right-hander) from breaking down during the stroke. When the right wrist gives on the forward stroke, putts are often pulled, sometimes come up way short or long, and tend to bounce because they're rolled weakly with improper spin. By locking the wrist in place, the saw/claw grip assures an on-line, pendulum-like swinging motion.

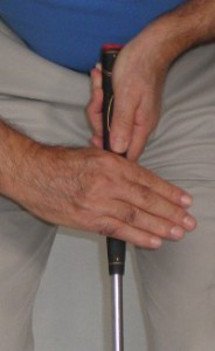
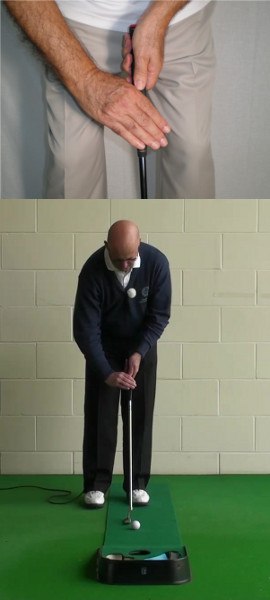
Here's how to hold the putter using the saw or claw grip method:
- Place your left hand on the club in your usual manner.
- With your right hand open, place the four fingers horizontally across the front of the grip (below the left hand).
- The right thumb grasps the underside of the grip.
- Stroke the ball with a simple back-and-forth rocking motion of the arms and shoulders.
The grip will feel awkward at first (and perhaps for a good while). Experiment with the placement of your hands and arms, but always stroke a few putts in each new position. Even if things feel all wrong, your results may indicate that you've found a grip that works.

Using the Claw/Saw Grip to Cure Putting Woes
The way you hold onto the putter has a lot to do with the stroke you will eventually make. Over the years, golfers have tried just about every type of grip imaginable in an effort to make more putts. If you are struggling with the putter in your own game, it is worth the time to experiment with a few different grip styles. One grip specifically, the claw (or saw) grip, has the potential to dramatically change the way you swing the putter. Not just a 'crutch' for amateurs, this style of grip is even used by some of the best golfers in the world.
For a right handed golfer, the claw grip is formed by turning over the right hand and gripping the handle of the putter with your palm facing in toward your body. The left hand position in a claw grip is the same as it would be for a traditional putting grip. Once you have your right palm facing in, you can grab onto the putter in a variety of ways. Some players will wrap all of their fingers around the grip, while others will only pinch it between their thumb and forefinger (sometimes called a pencil grip). If you are going to try this grip for yourself, take some time to experiment with different positions for your right hand until you find one that is comfortable and feels natural.
One of the nice things about making changes to your putting stroke is that they are usually pretty quick and easy compared to swing changes. The putting stroke is not nearly as complicated as the full swing, so you can do things like change your grip or stance and see good results almost immediately. There is no need to stick with the status quo on the putting green if it isn't working – feel free to experiment until you land on a combination that leads to the ball falling in the hole more often.
Remember, your short game requires just as much time and attention as does your long game. Many amateurs will spend hours on end working on their swings at the driving range, yet they walk right past the putting green on the way back to the car. Don't make the same mistake. If you are going to make progress with your game and see results in the form of lower scores, you are going to have to spend practice time on each facet of the game. Try splitting your practice time in half – 50% on the full swing, and 50% on the short game – and you will be giving your whole game a good workout.
All of the instruction below is based on a right handed golfer. If you happen to play left handed, please reverse the directions as necessary.

Benefits and Drawbacks of the Claw
There are pros and cons to any putting grip that you choose. The key is to find the grip that gives you the most benefits while limiting the drawbacks that it brings to the table. Of course, that equation is going to be different for each golfer. Some players, for example, will get a ton of benefit from using a cross-handed grip, while others will find mostly downsides to that putting method. By experimenting with different styles, you can find the one that best suits your skills.
Following are the typical pros and cons that most golfers will find with the claw putting grip. You experience may vary, but these points are a good place to start when trying to decide if this approach is the right one for you.
- Pro – Eliminate the yips. Getting rid of the yips is a popular reason for turning to the claw grip in the first place. By turning your right hand over, you take most of its power away during the stroke – and it is an overactive right hand that causes the yips. For a quick fix when you are struggling to make short putts, the claw grip is a great option.
- Pro – Lower right arm. Another benefit of turning your right hand over on the grip is the effect that this chance has on the positioning of your right arm. The right arm tends to drop lower when you go to a claw grip, which can make it easier to swing the putter on a good path. Many amateur golfers have a bad habit of swinging the putter to the outside during the backstroke, which is commonly caused by a high right arm at address. Switching to the claw can instantly correct that mistake and put your putter swing back on a proper path.
- Con – Loss of speed control. Many players who switch to the claw will note that they have trouble rolling the ball the correct speed – especially at first. You gain a lot of your feel for the putter through your right hand, and when you take power away from that hand, some of the feel is lost. The best way to regain your distance control is through plenty of practice. Over time you will begin to learn how to control the speed of your putts while using the claw grip. However, even with plenty of practice, your distance control may never be as good as it was with a traditional grip.
- Con – Less 'hit' in your stroke. The claw grip is designed to make a smooth, flowing putting stroke. While that can be a good thing, it can also take some of the 'hit' out of your stroke – an element that is useful on slow greens or uphill putts. Without much control in your right hand, you may find it difficult to accelerate the putter head quickly through the ball when needed. That element of your stroke won't be missed very often, but you may wish you could access it from time to time.
Obviously, those are just a few examples of pros and cons that can be experienced when using a claw or saw putting grip. Not all golfers will find these to be true on a personal level. For example, you may find that your speed control improves with the claw, or that your right arm position doesn't actually move lower. Again, experimenting is the only way to know for sure. Put the claw to the test and see how it performs in your own game.

Hitting Your First Claw Putts
To get started learning how to putt with a claw grip, simply head to your nearest practice putting green with your putter and a few golf balls. Find a flat section of the putting green that you can use for your first putts. Since you will be working on learning the new grip, you don't want to have to deal with difficult, breaking putts at the same time. You can move on to more challenging putts later, but get started on a flat section of the green that will make it easy for you to judge the quality of your stroke.
Set your golf balls down around four or five feet from the hole that you have selected and get ready to hit your first putt. Take your stance as you normally would, and place the putter head down behind the ball. At this point, you should be holding the putter with your traditional grip. Once your address position is complete, go ahead and drop your right hand off of the putter so that you are only holding the club in your left hand. When you take your right hand off of the club, try to maintain the position of the club behind the ball, as well as your stance.
Next, it is time to put your right hand back on the club in the claw grip position. Turn your hand so that your palm is facing in toward your body and your fingers are pointed down at the ground. Grab onto the putter just below your left hand with your thumb under the shaft and at least one or two fingers on top. At this point you can experiment with the exact positioning of your right hand until you land on a spot that feels comfortable. With your grip complete, go ahead and roll the ball toward the hole.
When working on a new putting grip, you need to pay careful attention to the feel of the putter as it moves back and through the ball. You can't rely only on results when changing your putting method because even a poor stroke will manage to knock the ball into the hole from time to time. Obviously you want to be seeing good results, but you also need to be happy with the way the stroke feels. Hit a series of putts with your new grip and make any adjustments that you feel are necessary as you go.
After a period of working on only straight putts, go ahead and find a sloped area of the putting green to work on some more difficult lines. Remember to focus on the fundamentals of your grip and your stance, and make a good stroke each and every time – regardless of how much break there is in the putt. As you hit these more challenging putts, watch for your ability to match up the line and the speed. Pairing those two elements is always the main challenge when putting, so if you can combine the right line with good speed time after time using a claw grip, you will know that you are moving in the right direction.
One more thing that you can do during this initial practice session is to switch back and forth between your old putting grip and the new claw grip. Hit a few putts with your old grip, and then hit a few putts with the claw. Which one feels better? This shouldn't be a scientific analysis as much as a choice based on your gut feeling. You need to trust and believe in what you are doing with the putter, so roll plenty of putts with both styles of grip until you are clear on which one is the better choice for your game.

Making Your Short Putts
Most golfers turn to the claw because they are struggling with short putts. While it can help with more than just holing out your three footers, there is certainly something to be said for the stability and consistency that your stroke can gain through this modified grip as you deal with those testy short ones. You will never fulfill your potential as a golfer if you are missing short putts, so feel free to give the claw a try if this is a weak point in your game.
As you learn this new grip, there are a few other pointers that you should keep in mind related to making short putts. Use these tips as you are practicing the claw grip to develop a stroke that is rock solid around the hole.
- Short backstroke. There are many causes of missed short putts, but a long backstroke is among the most common. It only requires a very small amount of energy to roll the ball to the hole from three feet away, so you don't need to make a big backstroke in order to generate sufficient power. Not only is a long backstroke unnecessary, it can actually be detrimental to your success. After making a long backstroke, you will be forced to slow the putter down through impact in order to avoid hitting the putt too hard. When that happens, the putter face is prone to staying open – leading to a putt that misses right of the hole. Most missed short putts go by on the right side for this exact reason. To correct that miss to the right, shorten your backstroke and accelerate through impact to roll the ball perfectly on line time after time.
- Inside the hole. On the vast majority of your short putts, there is no reason to 'give up the hole' with your read. That means that you should not be aiming your putts outside the hole from three feet and in. If you read some break in one direction or another, go ahead and play for that break as long as your initial target line still remains inside the edges of the hole. If you start to give up the hole from short range, you will be forced to hit your putts very slowly in order to give them time to break. It requires tremendous skill and touch to consistently make short putts with that strategy. Instead, keep your read inside the hole and use an aggressive speed to knock the ball in. The only exception to this tip is when you are putting on a severe downslope – in that case, you will want to use a gentle pace and play as much break as necessary to make the putt.
- Plenty of confidence. You aren't going to make a lot of short putts without confidence in your stroke. Perhaps more than anywhere else on the golf course, you need to have confidence that you are going to knock in each and every one of your short putts. Because there is an expectation of success when putting from close range, it is easy to put too much pressure on yourself when you get near the hole. Don't allow that to happen. Instead, simply focus on your pre-putt routine and make the best stroke possible. Are you going to miss from time to time? Sure – everybody does. Despite that, if you can convince yourself that you are a great short putter and you are going to make the next one, your rate of success will quickly increase.
There is another point that needs to be made regarding short putts, which is this – you aren't going to make them if you never practice. Just like you shouldn't expect to hit great drives if you never work on your swing at the driving range, you shouldn't expect to make short putts if you never practice them on the putting green. Spend time during every practice session, and before every round, holing out a number of short putts (both flat and sloped). This practice will not only fine tune your stroke, but it will also give you confidence after you see the ball go in the hole over and over. If you wish to make most of your short putts on the course, you have to earn that right by first doing the work in practice.

The Possibility of a Combination
As you spend more and more time on the practice putting green, you may find yourself a little bit conflicted – should you stick with this new putting method, or should you go back to your old grip? After all, the claw certainly has plenty of benefits, but you probably had found ways to make your old grip work as well. This decision has frustrated plenty of golfers, and you wouldn't be the first player to be caught in between an old method and a new one.
If you find yourself unsure of how to proceed, consider the possibility of using both grips. Instead of picking one over the other, you could integrate them both into your game in order to have the 'best of both worlds'. While this might sound like a difficult proposition, it just may be easier than you think.
For the majority of golfers, the claw grip is going to work well from short range and be more challenging from long distance. At the same time, most players are comfortable with their standard grip from long range, and they start to struggle as they get closer to the hole. You can probably see where this is going. To combine the two, you can simply use the claw grip when you are within a short distance of the hole, and use your traditional grip for all other putts. Instead of trying to overcome the downsides of each grip, you avoid those areas altogether by switching back and forth.
The following tips will be helpful if you try to employ this unique approach on the putting green
- Practice, practice, practice. Since you are using two different putting grips during a single round with this method, you will want to make sure you are getting plenty of practice with both grips. You don't want to feel like you are unprepared when you go to hit a short putt because you haven't been practicing your claw grip, so spend plenty of time in preparation to make sure the grips are equally comfortable.
- Set a limit. Before you start a round, decide how far away from the hole you will need to be before switching grips. This isn't a decision you want to make on the course because you will have plenty of other things to think about during the round. Using steps is a great way to measure your putts for this purpose since you can't pull out a tape measure on the green. For example, you could decide that any putts longer than three steps are going to be handled with your traditional grip, while putts inside that length are the territory of the claw.
- Stick to it. This kind of method can be successful on the putting green, but you need to commit to it even if you miss one or two along the way. Nobody makes all of their putts, so you shouldn't have unrealistic expectations when you switch to this plan. Expect your putting to improve, but don't demand perfection because you will inevitably end up disappointed.
The claw putting grip is a viable option for a wide range of golfers because it is easy to use, repeatable, and solid under pressure. There are some drawbacks to this putting grip, however, so be sure to put in plenty of time on the practice green before deciding if it is the right option for you. Whether you choose to go with the claw/saw grip for 100% of your putts, or you decide to use a combination of grips, approach your putts with confidence and expect to see the ball fall into the middle of the cup.


