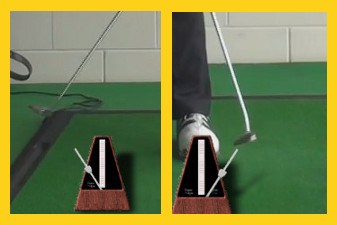
There's a dizzying array of stats available detailing the games of pro golfers. Like this one: The average pro's putting stroke swings to a rhythm of 75 beats per minute as measured by a metronome.
That means that if swung continually at the same pace, the putter would change directions 75 times in a minute -- one at the end of the backswing, two at the end of the follow-through, and so on.
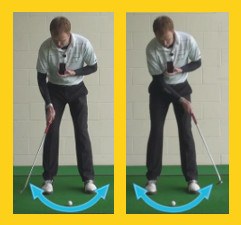
This tempo holds true regardless of stroke length, because the longer the back-stroke, the faster the through-stroke.
If you want a smooth, accelerating stroke, you'd be wise to emulate the pros. You can buy an actual metronome, or download a smartphone app which serves the same purpose.
Set it to 75 beats per minute and practice without a ball, hitting a beat at each end of your stroke. Practice often and you'll develop a truly grooved – and groovy – putting technique.
Putting Stroke Golf Drills
If you only had ten minutes available to practice your golf game, and you wanted to get the best possible use out of your time, what should you work on? The answer is easy – putting. No single part of the game has as much of an influence on your scorecard as putting, yet many players fail to give their putting the attention it deserves. You probably love to stand up on the driving range and blast away at your driver, but time spent on the practice putting green is going to be far more beneficial when it comes to actually improving your performance.
Whether you are already spending time practicing your putting or you are trying to get into a good habit of doing so, it will be helpful to have some go-to drills that you can use to work on your technique. There are a number of different elements that have to come together in order to have success on the greens – including green reading, handling pressure, and more – but it all starts with technique. Using fundamentally sound technique will help you to strike your putts solidly time after time. With some quality putting drills in your practice arsenal, it will be easier to iron out the problems in your stroke so that you are left with a motion that is reliable and easy to repeat.
A good putting drill should be simple, easy to complete in just a few minutes, and it shouldn't require any expensive or specialized equipment. Each of the drills that are included in this article meet those criteria. One of the key components to any kind of drill that you use in golf, whether it addresses your putting or any other part of the game, is that the drill closely replicates what you are trying to do on the course. If you use drills that get too far away from the actual shots or swings that you will be using during a round, they won't be very much help in the end. Practice should always closely match up with the 'real thing', because that is the only way you are going to see change.
Just like any other skill that you are trying to improve, working on your putting requires consistency. If you only do these drills once or twice before moving on to something else, you aren't going to be impressed with the results. Make it a point to integrate at least one or two of the drills below into your regular practice program. Each time you visit the range to hit balls, you should be spending a large percentage of your time on the putting green, and you should consider using at least a portion of that putting time on these drills.
All of the instruction contained in this article is based on a right handed golfer. If you happen to play left handed, please take a moment to reverse the directions as necessary.

Left Hand Only Putting
One of the easiest putting drills you can use – and one of the most effective – is putting with only your left hand on the club. By taking your right hand out of the equation, you will be able to feel how your left hand is supposed to control the stroke through the hitting area. Using too much right hand action while putting is a common mistake that is made by amateur golfers. Taking that hand off of the club completely means that you won't be able to make this mistake during the drill, so you will be forced to use your left hand in the correct manner.
As you swing the putter through the ball, you want to have the back of your left hand and left wrist moving toward the target with confidence. The back of your left wrist should be flat, and you should be moving it toward the hole all the way through the hit. This is where so many players go wrong. Plenty of golfers hesitate just before they make contact with the ball, which causes the left hand to stop and the right hand takes over the stroke. This mistake is commonly known as the 'yips'. Of course, you can't do that in this drill, because your right hand will be in your pocket or behind your back rather than on the club. With no right hand to fall back on, the only choice you will have is to keep your left hand moving smoothly through impact.
To perform this drill, you will only need a few golf balls, a putter, and a hole that you can use on the practice green. Since you are trying to isolate your left hand and focus on how it works throughout the stroke, you want to give yourself the easiest putt possible. Pick out a flat area of the green and set up just a few feet from the cup. Once you are set up, go ahead and start rolling putts right into the back of the cup with just your left hand. Hit as many putts as you would like until you feel that you have gotten a good sense for how your left hand is supposed to control the stroke.
If you are having trouble with this drill, you can make a couple of potential adjustments based on the problems that you are seeing. Following are two adjustments that can help get you on track -
- Missing right. If your left hand only putts are missing to the right of the target, you are likely sliding your whole body left as you strike the putt. Remember, you want to stay balanced and centered during your putting stroke, allowing the putting to swing freely in both directions. Your left hand and wrist should be moving toward the hole in the forward stroke, but your center of gravity should not be moving at all. If you get into the habit of drifting toward the target, you will typically push your putts to the right.
- Missing left. When the ball is being pulled to the left consistently, the problem is probably a breakdown of the back of your left wrist. The back of that wrist should be staying firm through the hit – if it is cupping at all near impact, the blade of the putter will be closed and the putt will miss left. Focus on holding the back of your left wrist as flat as possible throughout the putt because that move will give you optimum control over the putter face.
The great thing about this drill is the fact that you can sprinkle it in to your practice routine at basically any time. Even if you only have time for a few putts, you can quickly drop your right hand off of the putter to roll the ball with your left hand only. Not only is this drill a great one to include in your normal practice sessions, it is also helpful as part of a pre-round warm up. Hitting a few left hand only putts during your warm up will help to remind you of the things you should focus on while hitting putts out on the course.

Eyes Closed
The title of this section says it all – this drill is going to have you hitting putts while your eyes are closed. Why would you bother putting with your eyes closed in practice when you would never do such a thing during an actual round of golf? It's all about feel. Putting well requires great feel, but feel can be a tough thing to work on just by hitting putt after putt in the usual fashion. By closing your eyes, you will become more aware of what your body is doing during the stroke, and that information will help you improve going forward.
To start off with this simple drill, set up in the same way you did for the previous drill where you were putting with just your left hand. You again want to give yourself a short, flat putt, in order to maximize your chances for success. Also, if you were to try putting across the green with your eyes closed, you could wind up getting in the way of other golfers trying to practice. Stick to short little putts from three to five feet away on flat ground.
As you set up for the first putt, you should have your eyes open and you should go through your entire routine as usual. Pick out a specific spot on the green as your aiming point, take a comfortable stance, and position the putter head down on the green behind the ball. Only when you have completed all of those tasks should you close your eyes – in fact, closing your eyes should be the last thing you do prior to starting the stroke and hitting the putt.
At first, this drill is likely going to put you out of your comfort zone and you probably will struggle to strike the ball cleanly. However, you should not give up after just a couple of attempts. Be patient and stick with this drill until you start to make better contact and you start to hear more of your puts rattling in the bottom of the cup. From short range, your success is largely determined by how cleanly you are able to strike the ball in the middle of the putter face, so that is the challenge with this drill. Teach yourself how to make good contact while your eyes are closed and that same task should be a cinch when your eyes are open.
Just as with the previous drill, this is another one that is useful before a round. Taking a couple of minutes to hit some putts with your eyes closed can not only help you to feel your stroke, but it might also help you relax and focus on the task at hand. While rolling putts with your eyes closed, you will be better able to block out everything around you while preparing for play your best. Even if you only hit a handful of eyes-closed putts before your next round, you may see the benefit to this drill show up quickly on your scorecard.
Gradual Speed
The ability to control your speed just might be the most important single part of putting. Of course you want to get the ball on line as often as possible, but you have to get the speed right to go along with that line. Many golfers obsess over picking out the right line only to forget about focusing in on the speed to match. Not only will having good speed control enable you to make more putts, it will also help you avoid three putting by leaving your second putt within tap-in range of the cup.
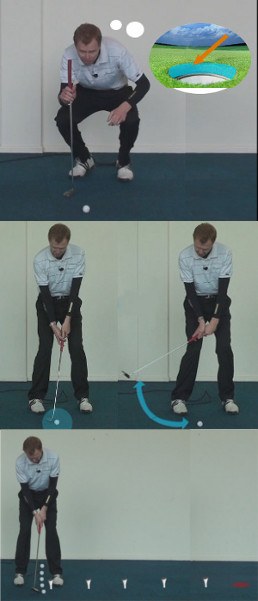
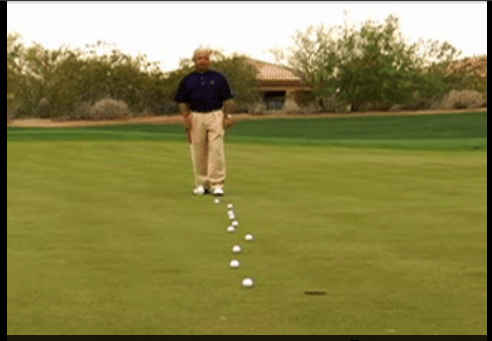
This speed drill is designed to help you feel how fast the ball is coming off of the face of the putter by requiring you to hit each subsequent putt a little bit farther than the one before. Basically, you will be hitting five total putts with the goal of hitting each putt past the previous one – but not beyond a certain limit. Some golfers call this a 'ladder drill' - whatever you call it, the end result should be better feel in your hands for the speed of your putts.
To set up for the ladder drill, place five golf balls down near the middle of the practice putting green. You should have at least 25-30 feet worth of room to putt, and the portion of the green that you use should be relatively flat. Identify a hole that you are going to use as your target – that hole will be the 'end' of your ladder (meaning you don't want to putt the ball past that point). With your hole selected, take a tee and put it into the green about 10 feet short of the hole along your line. The ten feet between the tee and the hole will be the area where you are trying to leave each putt.
For the first putt, you should try to roll the ball just slightly past the tee that you placed in the ground. If the ball comes up short of the tee, retrieve it and start again. As long as the ball manages to end up somewhere between the tee and the ball, you can continue on to the second putt. With the second putt, you are trying to get past the first ball, while still coming up short of the hole. The process repeats until you have hit all five putts. The drill has been completed successfully if you hit each of the five putts farther than the previous putt, with none of them rolling past the cup. If you hit any one putt too short or too far, reset the drill and try again.
Using this drill is an excellent way to learn how to make small adjustments to your speed control during the course of a round. The speed of the greens is always changing during the course of a round, due to weather, time of day, players walking on the grass, etc. You shouldn't expect to face the same green speeds on the first hole as you see on the last, so adaptation will always be required. By practicing this drill, you will get better and better at adding a little bit of speed on command. Of course, you can also do this drill in reverse in order to learn how to take speed off when necessary.

Par or Better Challenge
When it comes down to it, you simply need to get the ball into the bottom of the cup. It doesn't particularly matter how you do it – as long as it is done within the rules of the game. There are tons of different types of putting strokes on the PGA Tour, which is a sure indication that there is no one right way to putt. The drills you perform on the practice green ultimately need to be about finding ways to get the ball into the cup, and this last one is focused on exactly that objective.
For the par or better challenge drill, you will need just a single golf ball, your putter, and a practice putting green with several holes to use. This is a great drill to do when the putting green is mostly empty, such as late in the evening after most of the other golfers have gone home. The basics of the drill are as follows –
- You will 'play' 18 total holes, with each of them involving a first putt of at least 15 feet or so – the longer the first putt, the more difficult the drill will be
- Each hole consists of simply putting the ball until you find the bottom of the cup. There are no mulligans or anything of that sort, and you should try to do the drill without marking your ball to reset. Just hit the putts, one after the next, until you hole out
- Par for each hole is two. Knocking it in on your first putt would be a birdie, and three putting would be a bogey
- You can choose to make this drill relatively easy by selecting flat and short putts, or you can make it extremely tough with long, side hill rolls
The goal of the drill is simple – you are trying to finish all 18 holes with a score of par or better. Obviously, if the par of each hole is two, a total score of 36 will be even par. You will hit this goal if you manage to avoid three putting even a single time. However, if you do three putt once or twice, you will need to make a couple of birdies to offset the damage. In the end, if you add up the score and you are sitting at 36 or better with all of the holes completed, you will have completed the drill successfully.
One of the best things about this drill is the pressure that you will start to feel by the end of the process. Even if you are out on the putting green by yourself with nothing on the line, you will still feel the pressure that comes along with trying to hit a goal you have set. Those last few putts will start to look a little longer, and your two or three-foot tap ins might get a little scary. This kind of pressure is exactly what you will feel when putting on the course, so it is a great thing to replicate it during practice.
Another benefit to this drill is the ease with which you can turn it into a buddy drill. If you are out practicing with one of your friends, feel free to turn this drill into a competition between the two of you. The drill itself doesn't change – you play 18 holes around the putting green, and the person with the lowest score at the end wins. To make the game more interesting, you may wish to give the person who is currently behind in the score to right to pick the next hole. There is plenty of strategy that comes into this drill when you are making it a competition, and it can lead to great fun on the putting green (while helping you improve your putting at the same time).
Despite the fact that most golfers spend the majority of their time on the tee line instead of the putting green during practice sessions, you may actually find that practicing your putting is a fun way to spend your time at the course. When you start to use some drills to improve your technique – such as those above – the time will go quickly and you will become absorbed in the process. Also, putting contests are a great way to have fun with friends while engaging in a little competition. Dedicate more of your practice time to the art of putting and you will improve your scores while having plenty of fun along the way.


