“Chicken wing” is one of golf's most descriptive terms – and one of its ugliest maladies.
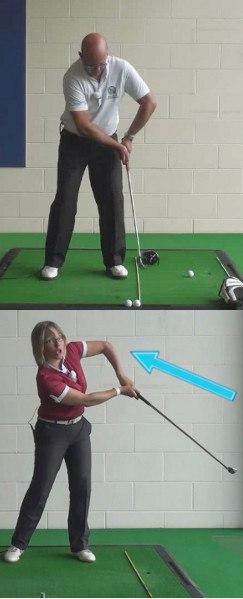
When a golfer's left elbow buckles outward (toward the target) after impact, the result is a “chicken wing.” Because the swing arc is narrowed and the clubface open, shots typically fly short and often right.
The chicken wing is extremely rare among professional golfers, with Lee Westwood being the most noteworthy exception. On the other hand, it's fairly common among amateurs and usually caused by one of these problems:
1. Over-rotating the shoulders relative to the hips during the downswing.
2. An overly steep approach angle into the ball.
3. Keeping the head too rigid.
4. Playing the ball too far back in the stance.
In a well-coordinated swing, the right hand and forearm roll or cross over the left through the impact area. The left elbow folds and remains tucked close to the body, rather than bowing outward.
A classic drill used to cure the chicken wing is to place a towel or similar object under your left armpit, then holding it there throughout the backswing and through-swing. First, try it without hitting a ball. You can also use just the left arm to make practice swings.
On the course, focus on keeping your left shirt sleeve tucked against your side on the follow-through. Your left arm and hand will give way to the rolling of the right, squaring the clubface for improved accuracy and power.

Chicken Wing in the Golf Swing
The “Chicken Wing” is a unique name used to describe a common flaw in the golf swing. The term “Chicken Wing” describes when the lead arm bends at the elbow with a cupped lead wrist at impact. The result is a bent arm that looks like a chicken wing. The proper impact position creates a straight lead arm and wrist so the club can lag behind the hands until impact. This creates the proper downward angle of attack that optimizes swing speed, distance and accuracy. The chicken wing in the golf swing leads to a loss of power and creates additional loft at impact with excessive spin on the golf ball.
The Chicken Wing in the golf swing is a visual breakdown on the upper body at impact, however, the lower body is also a cause that leads to the unwanted movement. Generally the lower body fails to produce the necessary speed and efficiency through impact, therefore the arms and hands try to make up for the loss of power and speed. The correct forward swing sequence is initiated with the hips, shoulders followed by the arms and hands. When the upper body initiates the swing sequence the swing path often becomes excessively steep with an over the top motion. The swing generated by the steep downswing and lack of hip rotation can lead to a bent left arm at impact. In addition, the lower body is usually under rotated while the club does not release properly through impact.
Chicken Wing and the Flying Elbow
The majority of upper body faults in the swing can be traced back to physical deficiencies in the lower body. When the lower body fails to move properly the upper body is forced to make compensations. Consequently, one result of poor lower body movements is the Chicken Wing.
The Chicken Wing in the golf swing is similar to the Flying Right Elbow, however, the Flying Right Elbow occurs during the backswing. The Chicken Wing is basically the opposite movement of the Flying Right Elbow since it occurs during impact and follow through. Therefore, the Chicken Wing is a Flying Elbow on the downswing. Simply reversing the physical stretches and exercises of the Flying Elbow can help prevent or eliminate the Chicken Wing.
Chicken Wing Physical Screen
If you are concerned about a potential Chicken Wing at impact try the following physical screen. Begin with a normal set up in your golf posture with both arms hanging down below your shoulders. You do not need a club for this exercise. Next, raise your left arm parallel to the ground while the right arm stays at your side. Extend your left arm straight toward the target so your arm is parallel to the ground while you form a 90 degree angle from your side and left arm. Next, bend your arm in a 90 degree angle at your elbow so your hand points directly in front of you. Your arm should remain parallel to the ground. Now your left arm is in the correct position and ready to begin the physical test. Rotate your forearm and hand up toward the sky while maintaining the 90 degree angle in your elbow. Maintain your original posture while your fingers point directly up at the sky. If you lose your original posture or can not rotate your arm to at least parallel or past your spine angle you do not possess the ability to externally rotate your lead arm and most likely create a Chicken Wing at impact. Therefore, it is easier to keep your lead arm bent through impact. If you can not externally rotate your lead arm you are a candidate for the Chicken Wing in the golf swing. Simply reverse the test on the right arm to test for a Flying Right Elbow during the backswing.
Right Arm
The golf swing creates several cause and effect relationships throughout the swing sequence. Many right handed players create excessive leverage with the right arm and hand throughout the swing. This occurs due to the natural muscle imbalance between the right and left arms. The right side is naturally stronger for a right handed player. Therefore, if the right arm is overly aggressive several swing faults can occur, specifically the Chicken Wing in the golf swing.
When the right arm dominates throughout the swing the left arm is forced to bend into the chicken wing. The perfect impact position creates a straight lead arm and wrist so the club head can lag behind the hands and whip through impact. Ideally, you want to create full extension with the right and left arm after impact. When the right arm takes over the left arm folds and prevents full extension.

Causes of Chicken Wing
The golf swing operates with a cause and effect relationship. Several causes of a chicken wing are the direct result of upper body and lower body movements. When the left elbow bends outward and toward the target through impact the result is a
"Chicken Wing." The arc of the swing narrows and the club face remains open, therefore the ball tends to miss to the right of the intended target. There are countless causes of the Chicken Wing, however, examine the following common causes of the bent lead elbow at impact.
Often one of the root causes of a bent lead arm at impact is a steep downswing. If you create a steep downswing that results in a bent lead elbow at impact practice hitting shots from a side hill lie so the ball is above your feet. This should help produce a flatter move similar to swinging a baseball bat. Swinging a baseball bat parallel to the ground is the extreme opposite of a steep downswing. Another option is to tee the ball up in the air as high as you can and allow the club to hover in the air at address. Again, this is designed to promote a flat swing similar to swinging a baseball bat.
Swing the club up to the top of your backswing and pause at the top. Practice bowing your lead wrist. The bowed position will prevent a steep downswing. In fact, the bowed wrist will significantly flatten the forward swing. Watch the swing of Dustin Johnson and notice the bowed wrist throughout the swing. Dustin Johnson creates a flatter swing through the entire forward swing.
Another common cause of a Chicken Wing in the golf swing commonly positions the right forearm in a more horizontal position at the top of the backswing. Overcoming the chicken wing is easier with a flatter swing plane. Therefore, alter the right forearm to a more vertical position so the right elbow is below the hands and points straight down toward the ground. When the right forearm is vertical, similar to a waiter holding a tray, the downswing should begin on a flatter plane. When the right arm is horizontal at the top of the backswing (think flying right elbow) the result is typically a steep downswing.
An overly steep downswing is similar to the motion of chopping wood. On the other hand, the opposite movement is an extremely flat swing, such as swinging a baseball bat. Practice the following drill to overcome a steep swing plane and understand a flat swing plane. Start with a 7-iron and extend your arms so the club is parallel to the ground. Next, start swinging the club back and forth and allow each pass to slightly lower a few inches. After about six to eight swings back and forth the club head should lower down just above the ground. The feeling of this drill is dramatically different than a swing with steep up and down swing plane.

Correct the Chicken Wing
The golf swing requires the arms and body working cohesively together to hit a solid golf shot. Many players create extra movements such as an incorrect release or bending the lead arm through impact. Therefore, try to correct the chicken wing with the “Towel Drill.” The principle behind the towel drill has been around for a long time. It is a great practice aid to help you learn the correct sequence of your arms and body working together in the swing.
Place a towel or head cover underneath the lead arm. If you have a large towel it could stretch underneath both arms. Apply enough pressure to keep the towel lodged in your armpit while you swing the club. Keep the towel in place while you make a waist high backswing to forward swing. While making the swing you should maintain a straight left arm while your hands reach waist high in the back swing. Avoid bending your left elbow while trying to make a bigger swing. Keep the lead arm straight through the backswing and impact. If you bend the lead arm the towel will fall. Holding the towel in place through impact helps teach the correct release of the club.
Begin with easy swings when you introduce a ball. This drill is not designed to hit the ball far. Rather, you will learn how to rotate your left arm through impact. As you swing through the ball your left elbow will point toward the ground. The arms and body should feel connected and working cohesively throughout the swing. Allow the hips to rotate toward the target. When you successfully complete this drill you will gain the proper understanding of how to correctly release the club through impact.
Grip Down Drill
One of the most effective, yet simple golf swing drills is referred to as the “Grip Down Drill.” There are very few drills that provide instant feedback while versatile enough to practice anywhere, including the comfort of your own home. The Grip Down Drill is beneficial to learn the proper movements of the swing including the swing plane, swing path and release of the golf club. In addition, the Grip Down Drill will correct the chicken wing swing fault. Begin by taking a normal stance. Place a club, umbrella or alignment stick on the ground (approximately three feet from your toes) parallel to your feet so it represents the target line. Grip the club on the shaft just below the grip on the shaft. Start with club head around your knees and the end of the grip pointing towards your stomach. Swing the club back so the lead arm is parallel with the ground. Allow the wrist to hinge so the butt end of the grip should points down toward the target line, forming the appearance of an "L" or 90 degree angle between the lead arm and club. Next, swing forward through impact and focus on a straight left arm and wrist while the club lags behind the hands. Continue swinging so the right arm is straight and the wrist hinges forming the appearance of an "L" or 90 degree angle between the right arm and the club. This is basically the opposite movement of the backswing. Try to keep the butt end of the grip toward the target line throughout the swing. If the end of the grip points toward your toes or other side of the ball the swing plane is slightly off.

Chicken Wing Drills
There are several causes of the chicken wing during the forward swing. The following Chicken Wing drills are all designed to teach you the proper feeling of maintaining a straight lead arm so you can create the proper downward angle of attack for more powerful and accurate golf shots.
Forehand Drill
Every PGA or LPGA Tour Player swings through impact with a straight lead arm and wrist while the club head lags behind. For this drill find a tennis racket or ping pong paddle. Grip the racket in your left hand and get in your golf posture. During the set up position the back of the left hand and racket toward your imaginary target. Next, swing the racket back in a similar motion as a golf club. When the left arm is parallel to the ground the racket should point directly in front of you. Swing the racket back to the impact position so the lead arm is straight and back of the hand faces the target. The sweet spot of the racket strings should also face the target. Continue the swinging motion forward so the right arm is parallel with the ground and left elbow points down toward the ground similar to the golf swing follow through. The back of the racket strings should now point directly in front of you. This drill is similar to a forehand with a tennis racket. Once you understand the movements of the lead arm and hand you can now try to implement this to your golf swing.
Lead Arm Only Swings
The Lead Arm Only drill will help eliminate a bent elbow in the lead arm at impact. This is a similar movement compared to the Forehand drill. Begin by placing your hand on the grip with your lead arm. Take your golf set up and begin by making swings so the lead arm at least reaches parallel with the ground. Continue swinging the lead arm and club to a similar position where the lead arm is parallel with the ground on the follow through. Pay particular attention how the lead arm moves throughout the swings. As the club swings back you should feel a slight rotation in the forearm during the backswing and forward swing. In addition, notice how after impact the left arm should bend at the elbow so the elbow points down at the ground toward the lead foot. The lead arm should not point behind you or at the target. If the lead elbow does not point down at the ground after impact you are creating a Chicken Wing. The Lead Arm Only swing is an effective Chicken Wing drill that helps position the elbow of the lead arm to point down after the club swings through impact. When the lead arm swings through correctly you will eliminate the swing fault known as the Chicken Wing.
Motorcycle Drill
Many players that create a bent lead elbow at impact cast the club from the top of the backswing. In addition, the casting motion creates a cupped lead wrist at impact, which often leads to a bent lead elbow. The Motorcycle drill is meant to retain the proper lag in the swing. The proper lag should help create a solid impact position and eliminate the chicken wing with the lead arm.
The Motorcycle drill is meant to prevent casting or releasing the club early. Preventing the cast or early release helps eliminate a bent lead elbow at impact. Begin the drill with a normal golf posture and swing the club up to the top of your backswing. Bikers understand when you want to give a motorcycle gas they turn their hands forward on the handle bars. This is a similar motion to start your downswing. From the top of your backswing, allow the lead wrist and hand to rotate toward your side. The lead wrist should be in a bent (bowed) position, not cupped at the top of your backswing. The bent wrist prevents an early release or cast to start your downswing. Allow the lead arm to reach impact in a straight position so the club lags behind the hands. When done correctly you will eliminate the early release or casting motion, ultimately preventing the Chicken Wing through impact.

Fix the Chicken Wing
The ideal impact position maintains a straight lead arm and wrist through impact so the club head can lag behind the hands and whip through impact. When the left arm bends during the backswing and impact you lose swing speed that results in a loss of distance and accuracy. If your goal is to fix a chicken wing focus on improving the impact position with a straight lead arm and wrist through impact.
During the set up you create an imaginary triangle between the arms and shoulders. This triangle stays in tact throughout the entire swing. In addition, the triangle helps position both elbows close together throughout the entire swing. Maintaining the triangle and creating the proper impact essentially eliminates the chicken wing.
Figure 8 Strap
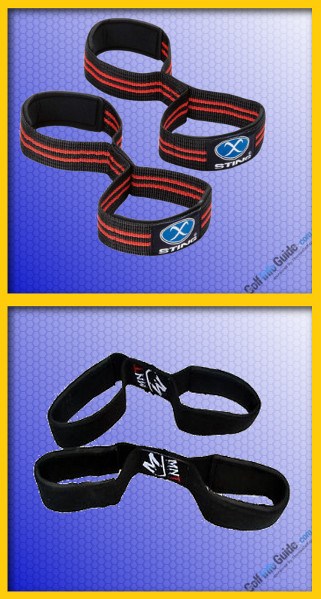
Many players allow their elbows to bend or separate their arms through impact. You form a triangle in your set up between your arms and shoulders and the figure 8 strap helps maintain the triangle and correct impact position. You will hit consistent shots when you maintain the “triangle” throughout the swing. The figure 8 strap might not be as mainstream as other training aids, however, it is extremely effective. The figure 8 strap is an elastic strap that essentially works like a pair of handcuffs for your arms. Slide both arms through each end and position the figure 8 strap just above your elbows. Take a few practice swings and hit a few balls on the range. The figure 8 strap will restrict your left arm bending through impact. In addition, the figure 8 strap will keep your elbows together throughout the swing. If you can swing through impact with a straight left arm you will fix a Chicken Wing and hit much more consistent golf shots. The figure 8 strap also helps create other proper movements such as the club head lagging behind your hands and left arm. In addition to fixing a Chicken Wing, the figure 8 strap can help eliminate a Flying Right Elbow during the backswing. The Figure 8 Strap is available for purchase for as little as $15.
The proper impact position and sequence of movements will both help fix a Chicken Wing in the golf swing. Focus on maintaining a straight lead arm and lag throughout impact. In addition, practice swinging the club on a flatter swing plane. The forward swing is initiated by the hips, followed by the upper body and lastly the arms. When the upper body over rotates relative to the hips during the forward swing the result is usually a slice and Chicken Wing. The over rotating upper body typically creates a steep swing plane and bent lead arm through impact. Therefore, focus on improving rotation in the hips. When the hips rotate first, followed by the upper body you will most likely create a flatter swing plane through the golf ball. Continue to swing through the ball and turn towards the target. If you hang back (under rotate) and keep the head too stiff there is a chance you create a steep swing that ends with a reverse weight shift and Chicken Wing through impact.
Lastly, basic fundamentals such as ball position have a huge impact on the shot and help fix a Chicken Wing. The golf swing is dependent on completing the previous move correctly. Therefore, setting up correctly makes it much easier to swing the club correctly. When the ball is positioned back too far in the stance the lead arm may be forced to compensate and bend through impact.


