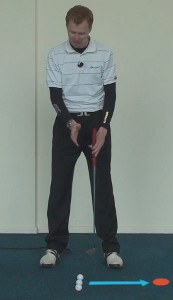
Failure to accelerate through the ball is a primary cause of missed short putts. If you tend to pull putts from inside five feet, you're probably decelerating.
The best way to ingrain an accelerating motion is to make the backstroke shorter than the follow-through. Try this drill, which involves no backstroke at all, if you're struggling to hole out from close range:
- Start by placing a few balls very close to the hole (no more than a foot or two away).
- Address the first ball in your usual manner and, without taking the putter back, push it into the hole.
- Follow through with the putter, holding the finish for a full count after the ball drops.
- Repeat for at least five minutes, moving outward from the hole as you gain better feel. Pushing the ball through, and making sure your putter face is still on the right line.
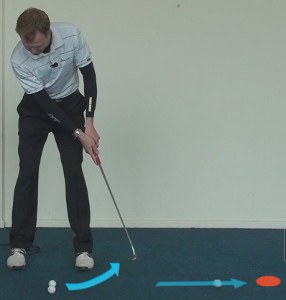
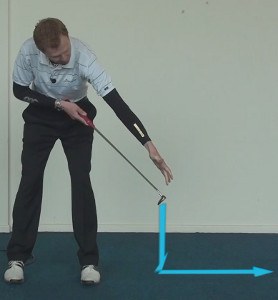
This drill works because it's impossible to push the ball without accelerating past it.
After a session, practice from the same length by making a short backstroke and striking putts firmly.

Putting Drills to Sink More Short Putts
To shoot a good score in any given round of golf, you can't afford to waste strokes. As you know, golf is a hard game, and every par or birdie you record is going to be well-earned. Wasted strokes have no place on a good scorecard, as it is simply too difficult to make up for wasted shots before the 18 holes have been completed. While many people think of penalty strokes as being wasted shots – and they are – the worst kind of wasted shot in the game is the missed short putt.
Nothing will knock your round off track quite as quickly as a missed short putt. Not only do you have to deal with the lost stroke which is never to be recovered, but you also have to deal with the frustration that comes with seeing the ball miss from close range. Standing over a three-foot putt for par, you feel like your par is pretty much in the bag. After all, you have already done the hard work of hitting the full shots required to put yourself in this position. Unfortunately, three-foot putts are not automatic, and you can miss if you fail to execute your stroke properly. When one of these putts does miss, you might find yourself taking several holes to regain your confidence and focus. The lost stroke is bad enough when you miss from short range, but the mental toll might be even worse.
Rather than sitting around worried about the possibility of missing short putts in your next round, you can take a proactive approach by getting out and practicing this part of your game. Perhaps more than any other skill in the game of golf, you can quickly improve on your short putting results through quality practice time. It may take months or even years to see the benefit of a full swing change in your game, but working on your short putting can start to pay off in your next round. As long as you are willing to work hard on this part of your game, there is no reason you can't start to make most of your short putts immediately.
In this article, we are going to offer up three putting drills which will help you to roll the ball better from a short distance. However, before we get into those drills, we are going to quickly highlight some of the keys to making your short putts. You don't want to get too mechanical when hitting your short putts, but you do need to have a few technical keys in place. It is much easier to make short putts when you aren't fighting against your mechanics. Execute your stroke nicely time after time on the practice green and you will be far more likely to knock them in out on the course.
All of the content below is based on a right-handed golfer. If you happen to play left-handed, please take a moment to reverse the directions as necessary.

Basics of Short Putting
The drills we provide below will be far more effective if you already have some basic short putting fundamentals in place. While there is room within the putting stroke for individual style and preference, the keys we offer up in this section are not really negotiable. If you hope to perform well on the greens from short range, you need to have these mechanics in your stroke – it's just that simple.
Fortunately, none of the three points listed below is particularly complex or hard to master. Spend a little time working on each of these three keys during your next practice putting session and you will be well on your way to consistent short putting performance.
- Head perfectly still. If you are only going to focus on one key while hitting short putts, let it be this one. When you keep your head still, the putter will be far more likely to remain on line throughout the stroke. Even a slight movement of your head prior to making contact with the ball can affect the face angle at impact – and it only takes a minor error to lead to a miss. Leaving the face open just a degree or two may be enough in some cases, so focus your attention on maintaining perfect stability above your shoulders. The difficulty on this point, of course, is resisting the temptation to look up early to see if the ball is going to fall in. Looking up early is not going to do anything to help the ball go in, and it might hurt your chances by altering the path of the putter. Stay down, keep your head still, and listen for the beautiful sound of the ball landing in the bottom of the cup.
- Right knee still as well. In addition to holding steady with your head position during the stroke, you also need to keep your right knee in place as the putter swings back and forth. Why is the right knee important? Think of it as a measuring stick for the rest of your body. If your right knee is allowed to drift away from the target as you swing the putter back – a mistake which is commonly seen in amateur golfers – your entire body is going to drift in that direction as well. With just this slight mistake, you will suddenly be out of place and you will have trouble making contact on the center of the putter face. It is just as important to hit the ball on the sweet spot with your putter as it is with any other club in the bag. Once you have settled into your putting stance, do everything you can to keep that right knee in place until the stroke is complete. As long as the right knee stays put, the rest of your body will as well.
- Finish the stroke. Hitting the ball hard enough to reach the cup from only a few feet away is not a difficult task. It doesn't take much of a stroke to send the ball with enough power to at least reach the hole, if not roll a little bit past. Since there isn't any concern about leaving these kinds of putts short, many golfers will decelerate their stroke as they arrive at the ball in an effort to not hit the putt too hard. It should go without saying that this is a bad idea. You want to be accelerating through the ball at impact in order to hit your line as accurately as possible. Players who slow down at impact are always going to struggle with accuracy, and they will particularly struggle when the pressure is on. If you are afraid you are going to hit the ball too hard by accelerating, the simple fix is to make a shorter backstroke. You don't want to rush your backstroke, but you don't want to let it carry on too long, either. Keep the backstroke compact and think aggressively as you stroke the ball toward the cup.
From a mechanical standpoint, the three keys above are all you need to perform well from short range. If you can manage to keep your head and right knee still while finishing your stroke confidently, you should see most of your putts fall right into the middle of the cup. No one makes every single short putt they face, but your percentage is going to be in a nice range as long as you stick with these fundamentals. Moving on in this article, we will offer you three putting practice drills to build your confidence before heading out onto the course.
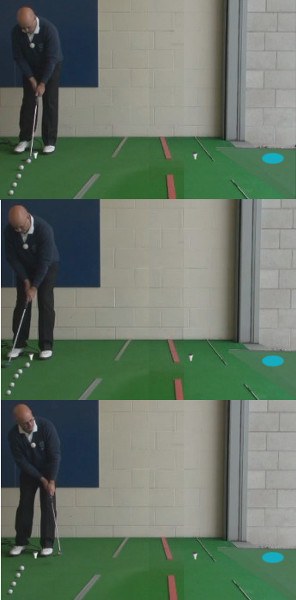
Drill #1 – 3 x 5
Just like the mechanics of your short putting stroke, it is also best to keep things simple when it comes to your putting drills. Complicated putting drills are only going to make practice sessions a chore – and you shouldn't feel like you are doing chores when you head to the golf course to work on your game. The game should be fun, so your drills should be simple, entertaining, and even competitive. This first drill is a great example of that concept.
To set up for this drill, you are only going to need a few pieces of equipment. You will need your putter, of course, and you will need to be at a golf course which offers a practice putting green for you to use. Also, you will need five golf balls, a small tape measure, and three golf tees. With just that short list of requirements, you can get started on a helpful short putting drill which will quickly build your confidence. To complete the drill, follow the steps below.
- Find a relatively flat spot on the putting green with a hole you can use for your drill. The ground doesn't need to be perfectly flat around the hole, but you shouldn't be standing on the side of a hill, either. Once you have picked out a hole, hook your tape measure onto the front edge of the cup and stretch it back to five feet. Take the three tees from your pocket and place one in the ground at three feet, one at four feet, and one at five feet. Once the tees are in place, you can put the tape measure away for the rest of the drill.
- To get started, set all five golf balls next to the tee which marks three feet from the hole. Simply put, your goal is to make all five putts. If you miss any of the five along the way, you are to reset and start over. You will continue to putt from this first distance until you successfully make five in a row.
- Once you do make five in a row from three feet, it will be time to move back to the four-foot mark. Again, you will be trying to make each of the five putts consecutively. At this point, there are two different ways to do the drill. One option is starting the drill completely over from the three-foot mark if you miss at any point along the way. Or, to make the drill a bit easier, you can choose to start over at each new distance as you proceed. In other words, a miss from four feet would not cause you to move back to three feet – it would simply cause you to start over from four feet. Whatever you decide, you will not be able to move back to the final distance until you sink all five four-foot putts successfully.
- To complete the drill, you will need to make five putts in a row from five feet. Even over flat ground, this is no easy task. You are likely to struggle at first with this drill, but stick with it until you start to see more and more putts drop in. If you manage to complete the drill 'the hard way' – by making all 15 in a row – you will know that your stroke is ready for the challenges it will see on the course.
This drill is an excellent way to improve your short putting for a couple of reasons. First, it is going to build your confidence by allowing you to see a large volume of putts fall in the middle of the cup. Even if you miss a few along the way, you are likely to make more than you miss – and all of that positive reinforcement will help tremendously on the course.
Also, there will be a bit of pressure built up during this drill as you near the end of the process. For instance, if you have made 14 in a row and you are trying to make one more five-footer to finish things off, there is going to be some tension built up in your hands and arms. This is a good thing, as you will feel those same nerves on occasion out on the course. Embrace the pressure and learn how to perform your best even while nervous.
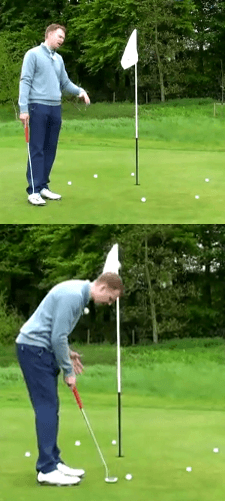
Drill #2 – Around the World
Moving on to the next drill, we are going to step away from the flat part of the putting green and instead go looking for a sloped section to work on more difficult short putts. Ideally, you will be able to find a hole that has been cut on a relatively steep part of the practice green. Of course, you can't really control where the holes are cut, so do the best you can with picking out a tough target.
Once you have picked the hole you will use, take out your tape measure once again to set up for the drill. This time, however, you are going to need six tees rather than just three. Extend the tape measure to three feet and work your way around the hole, placing a tee in the ground every 60 degrees (or so). In the end, the idea is to have the hole surrounded by six tees, each three feet from the cup. To complete the setup, place one golf ball next to each tee.
Now that you have six putting spots in a circle around the hole, it is time to get to work on making all six in a row. This, of course, will be a significant challenge, as you are going to be dealing with quite a bit of break on these short putts. While you can start with any of the six putts, it is often a good idea to start with the straightest putt to build some confidence. As long as you make a solid stroke, you should be able to funnel most of these putts into the cup despite the slope.
Once you make your first putt, move on to the next – you can go clockwise or counter-clockwise around the hole, whatever you prefer. The drill has been completed successfully when you make a full lap without missing a putt. If you do miss anywhere along the way, stop, reset, and start again. A good putter may make it around on the very first try, while someone who is shaky with the flat stick could be standing on the green most of the day trying to complete this challenge.
Obviously, the point of this drill is to help you get comfortable with sloping short putts. It is these kinds of putts which will be missed most often on the course, as they require you to aim away from the center of the target – which is hard to do when you are only a few feet away. You need to have good touch in order to make these putts, and you also need to do a good job of sticking with your fundamentals. Keep your head steady, make sure that back knee doesn't move around, and keep your eyes on the ball until after it is gone.
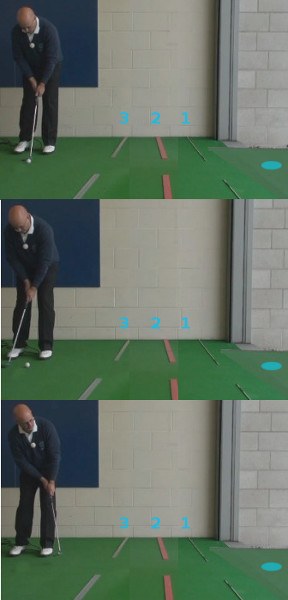
Drill #3 – Showdown
For this final drill, we are going to introduce the use of a friend to the equation. If you have a few regular golfing partners that you play with from time to time, invite one (or more) of them to come out for a practice session. Practicing with a friend not only makes the time you spend putting more enjoyable, but it can add a new element which will challenge you even further.
This showdown drill is going to pit you against one of your friends in a putting contest. For the setup, you are going to repeat the process from our first drill. You will prepare a spot on the putting green just as before – three tees in the ground, one at three, four, and five feet respectively. However, in the case of this drill, you and your opponent will each need only one golf ball.
To keep score, each of the three distances will be assigned a point value. Those values are as follows –
- Three feet – One point
- Four feet – Two points
- Five feet – Three points
The last step before getting started is to decide on a point total to use as a target score. Playing to 21 usually works pretty well, but you can decide based on how much time you have to play.
Now that you are ready to go, flip a coin to decide who will putt first. Whoever putts first will get to decide which of the three spots they are going to putt from to get started. For the sake of an example, let's imagine the player one putts from the three-foot spot to start, and makes the putt. It is now the turn of player two. At this point, the second player has an option. They can also putt from three feet in an effort to match the first putt. If they make, the hole is 'halved' and no points are awarded. If player two misses from three feet, player one will receive a point and it will be time for player two to go first.
However, player two does not have to follow player one to the three-foot spot. Alternatively, he or she could decide to putt from farther back. If player two putts from farther away and makes, they receive the point difference between the two spots. So, if they putted from four-feet in this example, they would receive a point. If the first player putts from the five-foot spot, the second player only has the option of matching that putt (since there is no longer distance). Play continues back and forth until one players reaches the target score.
Putting drills are a great way to build up your confidence before you get out onto the course. You can use the drills above during an average practice session, or you can use them as you warm up before a round of golf. Whatever the case, always remember to focus on your fundamentals and forgive yourself for the occasional miss. No one is perfect, especially in a game this difficult. Good luck!


