Chicken wing: Lee Westwood Video
Losing distance causes most golfers to react in a predictable manner: by swinging harder. The result is often decreased accuracy and, counterproductively, a further drop in distance.
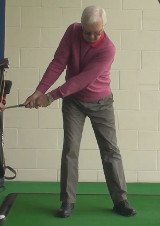
An over-aggressive move through impact creates tension in the arms, chest and shoulders. After contact, the left arm may bow outward into the dreaded Chicken Wing position, which prevents the clubface from rotating properly.
Here's a tip for increasing your clubhead speed without adding force (and tension):
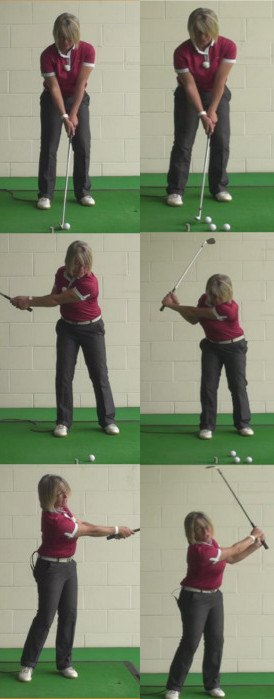
- At address, lightly push or squeeze the elbows inward (but not so much that you create stress).
- Practice making half-swings, taking the club halfway up the backswing without the elbows separating, then extending both arms outward – elbows still close together -- on the abbreviated follow-through.
- After several practice swings, hit a dozen or more balls with the same half swing, focusing on your extension through impact.
- Once you've hit several solid shots in succession, use the same action on full shots.
Remember: Swinging harder invites tension; instead, work on your elbow positioning for a more connected, efficient and powerful swing.

Finding Good Golf Swing Positions – All about the Elbows
Golf is a game that required very specific focus in order to be played well. To learn the golf swing, you have to have the ability to focus on one area of your swing at a time until you have successfully mastered it. The process of getting better at golf is made up of many little steps that can end up taking you a long way. By checking off one fundamental after the next as you spend time practicing your game, it is possible to become a far better player than you ever imagined you could be.
One of the specific areas of the golf swing that deserves your attention is the role of your elbows. Rather than thinking generally about how your arms should work during the swing, think more specifically and pay attention to the movements of your elbows. Each elbow plays an important role in the swing, although they have different responsibilities. Many amateur players get their elbows out of position during the swing, which can create all kinds of problems. If you are able to simply control where your elbows go – and where they don't go – you will quickly become a better golfer.
The good news is that the job of your elbows in the golf swing is pretty simple. In fact, golf can be made fairly simple if you don't allow yourself to overcomplicate it. Sure there are a lot of fundamentals to learn and techniques to practice, but taking them one at a time can allow you to keep your mind focused and clear while performing the task at hand. If you ever start to feel your mind get cluttered with too many thoughts while practicing or playing golf, you will know it is time to step back and take a deep breath. Keeping golf as simple as possible is one of the main keys to playing well.
Your current swing is probably a mix of good and bad elbow positions. As with any swing change that you try to make, it isn't necessary to toss out everything that you currently do and start over again from scratch. Instead, your goal should be to gradually modify your current swing a little bit at a time until the whole thing works better than it did before. In this case, that means trying to improve the positions of your elbows in the swing while not making too many other changes. Once you are happy with the way your elbows are working throughout the swing, you can then move on to other improvements if you so choose.
Please note that all of the instruction contained below is written based on a right handed golfer. If you play left handed, be sure to reverse the directions so that they apply correctly to your swing.

The Simple Role of the Left Elbow
For most golfers, the left elbow actually doesnt do much of anything during the golf swing. Most players will be best-served to keep their left arm straight throughout the swing, with the exception of when it folds up in the follow through. While a few golfers will be able to hit good shots with a bent left elbow in the backswing, that is a technique that most players should avoid. When you keep your left arm straight throughout the backswing and downswing, you will be able to simplify the swing and make it easier to hit solid shots.
That doesn't mean that you just get to forget about the left elbow, however. It is still important that you focus on the position of your arm as a whole so that you can put the club into the right places – especially at the top of the swing. At address, make sure your left arm is kept in tight to the side of your body. This position will make it easier to turn away from the ball during the takeaway without getting your hands too involved in the swing. One helpful thought is to squeeze your elbows together at address. Of course you don't want them to actually touch – they should be several inches apart – but just the sensation of pulling them in together can help you establish a good address position from which to start your swing.
Another ingredient in the proper use of your left elbow is to make sure that your arm isnt locked straight during the swing. This is a tricky part of golf instruction, because it can sound contradicting to say that the left arm should be straight, but not locked. The difference is in the feeling that you have in your left elbow during the swing. Locking your arm out straight will cause it to feel tight and restricted, making it harder to maintain a good tempo and feel in your swing. You do want the elbow to remain straight during the swing, but it should still be relaxed and comfortable at the same time. This is a hard balance to strike, but you will find that your swing is much more consistent when your arm is both straight and relaxed.
Making some one-handed practice swings is a good way to learn the proper sensation in your left arm. Try using one of your short irons to make some practice swings while only holding onto the club with your left hand. You should find that your arm remains straight during the swing, mostly by necessity – it needs to be straight to support the weight of the club. However, as you swing down through the hitting area (where the ball normally would be), you should feel that your arm is relaxed and doing its job of pulling the club through the swing. If you feel an excessive amount of tension in your left arm during this drill, try engaging your shoulders more in the swing so you can let your left arm relax slightly. Remember, the rotation of your body should do most of the work when it comes to swinging the club – your arms are mostly along for the ride.
In the end, there isn't very much to think about with regard to the position of your left elbow during the golf swing. As long as you keep it in close to your side at address and keep it straight (but not locked) during the swing, it shouldn't cause you any problems. The right elbow, however, is going to have a lot to do with the success or failure of your golf swing.

Using the Right Elbow Properly
The position of your right elbow will determine a lot about the ultimate quality of your golf swing. While there are very few hard and fast rules when it comes to the golf swing, the proper positioning of your right elbow is likely one of them. When your right elbow gets out of position, especially early in the swing, there is very little that you can do to get back on track. However, when you do a good job with the right elbow, you will have conquered one of the most-important parts of the swing.
Following are three keys that pertain to your right elbow in the golf swing. Hit on all of these three points and you will be well on your way to creating quality golf shots.
- In tight at address. Just like with your left elbow, the right elbow should be in tight to your side when you take your stance. This is important because of how it affects what you will do during the takeaway. If you were to set up with your right elbow out away from your side, the tendency would be to slide away from the ball, rather than rotating. That would be a bad mistake, and one that you would have trouble recovering from. Avoid that issue by keeping your right elbow in near your side so you can rotate your shoulders to the right at the start of your swing. During the first few inches of the backswing, your elbow should remain in close to your body as the shoulders do the work of moving the club back.
- Pointing down at the top. One of the most-important positions in the golf swing is the top of the backswing. When you are in a fundamentally-sound position at this point, you stand a great chance of hitting a good shot. At the top of the backswing, your right elbow should be pointing down toward the ground. This is where so many people go wrong. Countless amateur players allow their right elbow to get too high into the air at the top of the backswing. This is easy to notice because it results in the right elbow pointing behind the player instead of down at the ground. A high right elbow leads to a long list of swing problems – specifically, an over-the-top swing action, which can create a slice. In order to become a quality ball striker and improve your ability to create the same ball flight swing after swing, you need to learn how to keep your right elbow down at the top of the swing.
- Holding the angle on the way down. When you properly keep your right elbow pointing down toward the ground at the top of your swing, it will naturally be in a bent position. As you start down, it is your job to maintain that bent right elbow for as long as possible. This is really where you can start to generate some speed. When the elbow remains bent during the start of the downswing, you can rotate your body aggressively toward the target and bring the club along for the right. At the last moment, your right arm will straighten and the club will be accelerated into the back of the ball. If there is a secret to power in golf, this is it – maintaining the right elbow angle as long as possible in the downswing. If you give up that angle early on, you will waste potential club head speed and your shots will be weak and typically off line.
None of those three right elbow keys are particularly complicated, but they happen fast. If you are trying to think about all three of those keys during one swing, your mind will probably not be able to keep up as the swing goes by. The only way learn the proper right elbow position in the golf swing is to learn one key at a time and only move on once you are comfortable with what you have learned. So, start by working on your address position. After you are comfortable taking a stance with your right elbow in close to your body, move on to the next key. Taking it one step at a time will give you a far better chance at success than if you were to try learning the whole process all at once.

Right Elbow Position Drills
If your current right elbows position in your golf swing could use some improvement, the two drills below should help you make the appropriate changes. Using drills on the practice range is a great way to create new habits in your swing so that your new technique is more likely to stick when you take it out onto the course. Do both of these drills as often as necessary to make the new right elbow position feel as comfortable as possible.
For the first drill, you wont be hitting any golf balls. However, you will need a club (a mid-iron will work nicely) and an area to safely make some practice swings. To start, take your normal address position as if you were going to hit a regular shot. Of course, you will want to make sure that your right elbow is in close to your side at address, as covered earlier. Once you are happy with your address position, start your swing and move the club all the way up to the top of the backswing. Once at the top of the swing, hold your position and check to make sure that your right elbow is pointed down at the ground. As long as the elbow looks good at this point, start your downswing motion – but only go down a few inches. After a few inches of the downswing, reverse your motion and go back up to the top of the swing. Repeat this action a few times, so that you are rehearsing the start of your downswing over and over. After a few repetitions back and forth, go ahead and swing through to a full finish.
This drill will accomplish a couple of things. First, it will help you feel just how your right elbow should be moving at the top of the swing. The first move for your right elbow should be down toward the ground, not up away from your body. By repeating that action over and over again, you will be teaching your body what it needs to do. As an additional benefit, this drill is great for working on your balance. If you find that you are having a hard time holding your balance while completing the drill, you will know that you have something else to work on. Once you are able to comfortably do this drill several times – and keep your balance – it will be time to move on to the next drill.
For this drill, you will actually be hitting some golf balls. Therefore, you should be at the practice range, and you can go ahead and use the same mid-iron as you used for the previous drill. Prior to starting the drill, find an extra golf glove or a small golf towel that you can use to help you. As you take your address position to hit a shot, place the glove or towel under your right armpit and trap it in place. Your stance should be the same as always, except you will have the small towel or glove held in position under your arm. From this point, just make your normal swing and try to hit a good shot.
What happens to the glove or towel during the swing? Does it stay in place, or does it fall to the ground? This will tell you a lot about the position of your right elbow during the golf swing. If the glove or towel remains in place up to the top of your backswing and into the downswing, you are doing a good job of keeping that right arm in close to your side. It is okay if you allow the glove or towel to fall to the ground during your follow through as your arms extend out in front of your body. However, if it is falling to the ground at any point during the backswing, you will know that you have more work to do. Continue using this drill periodically to make sure that your right elbow is doing its job in setting you up for a compact and aggressive downswing action.

Elbows and the Short Game
Your elbows play an important role the short game as well. However, because your short game shots require small swings, the motion that your elbows make is rather simple and straightforward. In fact, as long as you get them in the right position at address, there is very little that can go wrong.
When putting, you want to make sure your elbows are in close to your sides – even closer than they are when you set up for a full swing. Since you only want to use your shoulders to move the putter back and through, keeping your elbows in tight will help to take your hands and arms out of the stroke. Hit some putts on the practice green while focused on keeping your elbows in tight throughout the putting motion. This is particularly important on the follow through – many golfers let their left arm drift away from their body during the forward stroke, which can lead to pushed putts that miss to the right of the hole. When your left elbow stays close to your side, the putter can release and it will become far easier to roll the ball on line. If you are a player who struggles with missing short putts from time to time, fixing the position of your elbows can go a long way toward correcting that problem.
As far as chipping is concerned, it is much the same story. Again, at address, you want your elbows in close to your body. However, as you move through the ball with your chipping motion, it is okay to allow your left elbow to move away from your body and toward the target. This can actually help to keep your hands in front of the ball to make sure you are hitting down through impact. It shouldn't be a drastic move away from your body, but allowing the left arm to drift slightly toward the hole through the shot is just fine. With that said, you never want to allow your right elbow to get away from your side during the backswing of a chip shot. Keep it in tight, and use your shoulder turn to get the club into position.
Managing the position of your elbows during the golf swing is an important piece of the overall golf puzzle. If your elbows – specifically your right elbow – are out of position in your current golf swing, they are likely making the game much harder than it needs to be. By making a couple simple adjustments to your address position and your swing technique, you can quickly find yourself hitting better shots that fly both longer and straighter. Work these changes into your swing on the practice range first before you try taking them with you out onto the course. Focus on one key at a time, and only move onto the next once you are confident that you have made the previous key a comfortable part of your swing. Take this approach and you could be making a significantly better swing after just a few practice sessions.


