Curious just how fast putts roll on your linoleum floor or synthetic putting green?
Want to know the speed of the surfaces on your home course? There's an app for that. It's called a Stimpmeter.
It's an ingeniously simple device – basically, a notched, V-shaped metal rail. The USGA sells its official Stimpmeter only to golf course superintendents or managers, so you'll have to obtain one through other means (such as an online auction site or retailer). You may also find instructions online for making your own Stimpmeter with materials found at any hardware store.
Some golf courses post their current green speeds on the Internet, in the pro shop or near the practice green. However, most courses make this info readily available. You can always ask for it, but you'll likely get a ballpark figure that may or may not be accurate.
Before we explain how to measure green speed using a Stimpmeter, note that course management may take offense if they see you checking the pace of their greens. Some clubs like to flaunt their greens as “the fastest in town,” while those whose surfaces lag behind aren't necessarily dying for potential customers to know. In other words, green speed can be a touchy subject.
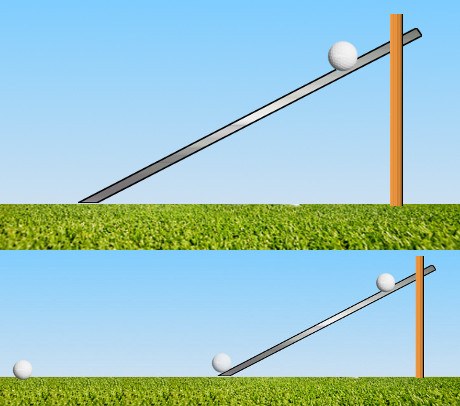
Moving on… The Stimpmeter is easy to use. Just follow these steps:
- Find a flat portion of the surface being tested. It should be about 10' x 10'.
- At the edge of the area, aim the bottom end of the device toward the area's center and place a ball in the notch; the Stimpmeter should lie flat on the ground.
- Slowly lift the end closest to the notch until the ball is released. Hold the meter steady until the ball hits the surface.
- Measure the distance between the ball's stopping point and the end of the Stimpmeter, then repeat the procedure twice more for accuracy.
- The measurement, in feet and inches, is the Stimpmeter reading. For example, 10'6”.
For comparison's sake, the greens on a typical public golf course “Stimp” at about 8 – 8.5”. On the PGA Tour, greens are routinely 11' – 12', and sometimes 14' or higher for the Masters, U.S. Open and a few other events.

How to Measure Green Speed?
When you arrive at the golf course for a round, one of the first things you need to do is determine the speed of the greens for the day. Green speeds can change from day to day even on the same golf course – in fact, they can change from hole to hole as you go through the round. There are a number of factors that come together to determine how fast or slow the greens will roll, and it is your job to pay attention to those factors in order to control your ball properly. It is safe to say that mastering the speed of the greens is one of your main jobs as a golfer, and it is one of the skills that will allow you to shoot low scores.
For professional golfers, figuring out green speeds is something that is always on the top of their to-do list. Touring pros play in a new location nearly every week, so they have to be able to adapt quickly in order to putt well. You probably don't travel to play golf quite like a Tour pro, but you are still likely to play a variety of courses throughout the year. Developing the ability to gauge and then adjust to changing green speeds will make you a better player. Golf is a hard enough game as it is, but it becomes nearly impossible when you don't have a good feel for the speed of the putting surfaces.
In this article, we are going to look into the topic of measuring green speeds. There are really two ways you can view the question that is posed in the title of this article – you can think about literally measuring the green speeds, and you can think about 'measuring' in terms of learning how to control your ball on a given set of greens. We are going to cover both of these topics. Actual measuring of green speeds is done with something called a Stimpmeter, while learning how to putt on greens with a specific speed comes down to basic trial and error. When you are finished with this article, you should have a firm grasp on this topic from all angles.
It should be noted that green speeds affect more than just your putting during the course of a round. Sure, you need to have the speed of the greens down pat if you are going to putt well, but this topic also affects your chip shots, pitch shots, and even approach shots. Any shot you hit with the goal of finding the green is going to be affected in some way by the speed of the greens. For this reason, the importance of reading the speed of the greens cannot be overstated. Take time before your round begins to focus in on this point and you will be far more likely to succeed when the round gets started.
All of the content below is based on a right handed golfer. If you happen to play left handed, please take a moment to reverse the directions as necessary.
Using a Stimpmeter
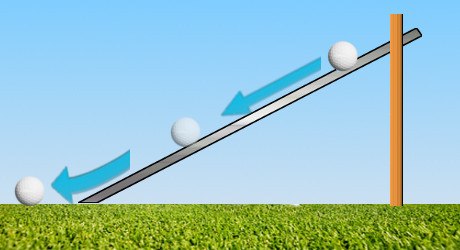
The Stimpmeter is a piece of golf maintenance equipment that was developed in 1935 by a man named Edward Stimpson. The device is extremely simple, and it has a very simple job to do. Basically, up until 1935, there was no way to accurately measure the speed of the greens on a golf course. Players could say that greens were 'fast' or 'slow', but there was no objective way to put a number to those perceptions. That changed when Stimpson came up with his Stimpmeter. This device rolls the ball at a controlled speed each time it is used, so the distance of the roll out can be used to measure the speed of the greens in feet.
If you would like to measure the speed of the greens at your own club, you would simply need to acquire a Stimpmeter and then follow the directions below.
- Bring the Stimpmeter and a few golf balls to the green that you would like to measure, along with a tee and a tape measure. You will need to find a flat section of the green on which to perform the test – measuring green speeds when going up or downhill is naturally going to skew the results. Not all greens have a flat section which is suitable for this test, so you may need to find just the right putting surface on the course before you can get an accurate reading.
- With a flat section of the green located, you will need to mark a starting point for your test. One easy way to mark your starting point is by placing a tee into the putting surface. Place the ball into the notch in the Stimpmeter, and raise the device slowly until the ball falls out of the notch and rolls away. When the ball has come to a rest, measure the distance that it has traveled. This is your first reading.
- Repeat this test two more times going in the same direction. When complete, move the Stimpmeter to the other side and run the test again, with the balls rolling in the opposite direction. Switching directions halfway through the test will allow you to negate the impact that the grain of the grass will have on green speeds. Once you have rolled the ball three more times from the other end, you will be done with the testing.
- At this point, you should have six readings – three from each end of the flat section of green which was used for the test. To come to a final determination on green speed, add up these numbers and divide by six. This number, stated in feet, is the speed of the green according to the Stimpmeter.
You will often hear golfers refer to green speeds by just stating a single number, such as when somebody says the greens are 'running at a 10'. That means that the greens are running out an average of 10 feet when measured using the Stimpmeter. Fast greens will usually register readings up around 10 feet and beyond, with readings of 12 or more being common for professional tournaments. Depending on the weather and other factors, the average golf course will usually come in around the 8-10' range. Anything slower than 8' or so is going to see like a pretty slow green by modern standards.
As a golfer, using a Stimpmeter can be a relatively interesting process, and it can show you have dramatically green speeds can vary from day to day (if you test regularly). However, as a practical tool to help you play better golf, the Stimpmeter doesn't really have much to offer. Telling yourself that the greens are 'running at a 10' really isn't going to help you play better golf, because that information is largely useless to your hands as you make a stroke. Instead of thinking about green speeds as a number, you should be more concerned with how the greens 'feel' when you are putting or chipping. In the next section, we will discuss how you can measure green speeds in a practical way which will lead to improved performance on the course.

Practical Measurement of Green Speeds
For most golfers, there is no need to purchase a Stimpmeter. You can leave that piece of equipment to the maintenance staff at your golf course, as it isn't going to do much for your performance. Instead, the best way to 'measure' green speeds before you play is simply to arrive early and spend some time on the practice green. Warmup putting is not only about getting your stroke in order for the day – it is also about learning the speed of the greens. In fact, it could easily be argued that the single most important thing you need to do before teeing off is to learn the green speeds. Without this piece of information in your mist as you walk to the first tee, you will almost certainly struggle over the first few holes until you make the necessary adjustments.
While most golfers do manage to make their way to the practice green before they tee off, most waste this time by just hitting a few putts without any rhyme or reason. If you are actually going to dial in your speed control before you tee off, you need to have a plan for your warm up putting session. Consider using the process below to get yourself ready to play (of course, this process can be tweaked as necessary to suit your needs and preferences).
- To start, take your putter and three golf balls from the bag. Find a long stretch of open green and hit some long putts from one side of the green to the other. It is typical for most golfers to start out with short putts, but you will get far more benefit from rolling long putts at this point. Use the edge of the green on the other side as a target for your putts – try to roll the ball up as close to the edge as possible without going off the green.
- As you roll these long putts, pay close attention to the speed of the practice green. Are your putts rolling out farther than you expect, or do they seem to be stopping quickly? It should actually only take a few long putts for you to start to get an idea for the green speeds on the day.
- With your long putting completed, find somewhere on the green where you can hit a 15-footer to a hole. Place all three golf balls down on the ground and hit each toward the hole you picked out 15' away. The goal with these putts is to get them at least to the hole, but don't allow them to roll more than a couple feet past. At this point, you are really testing your ability to control your ball on the green. If you are coming up short with your 15-footers, you will know the greens are slightly slower than you expect. Or, on the other hand, if the ball is running out several feet past the cup, the greens are fast and you need to adjust your stroke accordingly. Repeat this three-ball drill until you feel comfortable with your speed control from mid-range.
- Finally, it is time to hit some short putts. Drop your golf balls at around 3'-4' from the cup and knock them in one at a time. Short putts don't change much based on the speed of the greens, but you do need to be careful not to be too aggressive when the greens are fast. After you have holed several short putts consecutively, you will be ready for the first tee.
As you can see, you don't need to hit a large quantity of putts in order to prepare yourself for the green speeds you are going to see on the course. The entire process listed above shouldn't take more than 15 minutes or so, and that time will be well spent when you get out onto the course and already have a great feel for the putting surfaces. While your playing partners are spending the first few holes trying to get dialed in, you will be ready to make putts starting on the very first green.

Adjusting on the Course
The preparation that you do prior to hitting the first tee is going to go a long way toward helping you putt at a high level. Unfortunately, that preparation is not always perfect, however, as some courses will have greens that vary in speed between the practice area and the actual course. If you get out onto the course to find that the greens are a different speed than what you expected, it will be important to adjust as quickly as possible.
No matter how much preparation you have done on the practice green, you should always be paying close attention to the first few putts that you hit during your round. Putts coming up well short or rolling out well past the hole are obviously cause for concern, as those are sure signs that the green speeds on the course are not going to match up with the practice green. Take note of any big differences that you find between the practice green and the course and adjust right away.
While you can't necessarily predict which way this adjustment will go, it is more common for the practice green to be faster than the course, rather than the other way around. With so much foot traffic on the practice green each day, it will often become firm and fast – at least, firmer and faster than the greens on the golf course. This is not a hard and fast rule, of course, but don't be surprised to find greens on the course that run a bit slower than what you expected.
Another thing you need to consider while on the course is the geography of the land around each green. For instance, a green that is sitting down in a bowl will usually have more water available to it, meaning the grass will be more lush and the surface will be slower overall. On the other hand, a green which is sitting up on a perch will usually be fast due to a lack of water and the drying effects of the wind. Experienced golfers look at not only the green itself to get a read, but also at the surrounding terrain.
Speaking of surrounding terrain, check for trees around the green which may be blocking sunlight from reaching the putting surface. An abundance of trees will prevent the sun from drying up the green, meaning your putts will likely run slower than they will on greens which get plenty of sun. While you don't want to overwhelm yourself with details as you try to predict green speeds, it is important to take all relevant information into consideration before you hit the putt.
It is important to note that the job of adjusting to green speeds is never complete. You can never really get comfortable on this point, as things can change throughout the day that will impact how quickly your ball runs across the green. Always pay close attention to how your ball behaves and be willing to adapt quickly in order to achieve the best possible results with your flat stick.

In-Round Changes to Green Speeds
As was just mentioned above, you can't count on greens remaining the same speed from the start of a round on through to the finish. After all, rounds of golf regularly take more than four hours to complete, which is plenty of time for the condition of the greens to change significantly. What kind of events can occur which will impact the speed of the greens? Check out the list below for a better understanding of this topic.
- Bright sunshine. You don't need to be a professional landscaper to know that grass is going to grow quickly under bright sunshine. When the sun comes out in the afternoon, you can expect the blades of grass on the greens to grow quickly until sunset. Of course, that means your putts are going to get slower and slower as the day wears on. If you look carefully, you might even be able to see your footprints on the greens as you step on the freshly-grown surface. Take note of this possibility and hit your putts a bit harder as afternoon turns into evening.
- Rain. A rainy day is pretty much the opposite of a sunny day, yet both of these weather conditions will have the same effect on the greens. When rain comes down during your round, you can again expect the surfaces to get slower. Water will sit on top of the green for a short amount of time after it falls, offering resistance to your putts. Not only should you hit your putts harder on wet greens, but you should also play slightly less break as well. Hitting your putts harder will cause the ball to hold its line longer after it is struck, meaning you don't need to give the ball quite as much room to turn into the hole.
- Strong winds. Unlike the first two points on our list, wind is one weather condition that will actually serve to speed up the greens. If a strong wind kicks up during your round, moisture is going to be pulled out of the putting surfaces – and your putts will become faster as a result. When taking this factor into account, be sure that the green in question is actually affected by the wind. Greens which are protected by other terrain will not be dried out as quickly as greens which are exposed to the elements.
- Dew evaporation. When you start your round early in the day, you may encounter some dew on the first few holes. This dew is not a big deal, although it will cause the greens to be a bit slower than they would be otherwise. Of course, that means the greens are going to speed up as the day goes on and the dew evaporates away. As you see the dew get lighter and lighter, plan on the greens playing faster as a result.
It is nearly impossible to play good golf without having control over the speed of the greens. This is a topic that seems relatively simple, yet it can get quite complicated as you learn more and more about what goes into the speed of putting surfaces. To give yourself the best chance to putt well during a given round, be sure to arrive early to spend some time on the practice green. Once on the course, pay close attention to how your putts are rolling out and adjust your stroke accordingly. Good luck!


