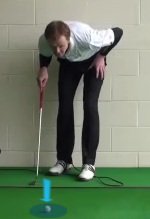
The practice of “plumb-bobbing” a putt's line draws scowls from some golf purists, but the method can be an effective way to determine a putt's break. Just ask Ben Crenshaw.
One of the game's greatest putters – and a noted traditionalist himself – Crenshaw is exhibit A in the argument for plumb-bobbing. In essence, plumb-bobbing can tell you which side of a putt's line is higher. In other words, in which direction the ball will break.
It's not necessary to plumb-bob every putt, since the slope on most greens is fairly obvious. But sometimes it can be tough to determine with the normal technique, and that's when plumb-bobbing comes in handy.
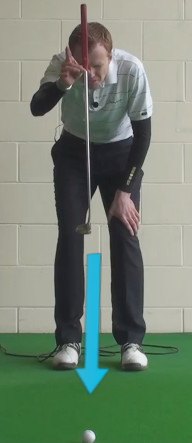
Here's how to properly plumb-bob a putt:
- Get into a crouch 5-15 feet behind the ball. For longer putts, you may want to stand upright.
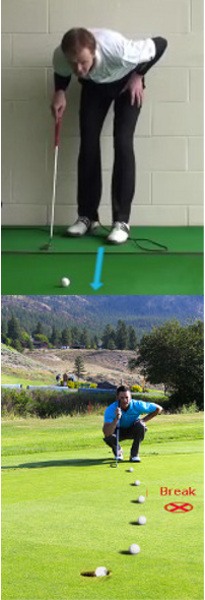
- Using your thumb and forefinger, hold the putter just below the grip so that it hangs perpendicular to the green surface, in front of your face, with the clubhead just off the ground.
- The shaft should form a straight line from the ball (bottom) to the hole (top).
- Looking through only your dominant eye* (with the other eye closed), note whether the green to one side of the shaft appears higher than the other. If the high side is to the right, for example, the putt will break left. You may also notice that the hole tilts in one direction.
Those who dismiss plumb-bobbing often point out that many greens feature multiple slopes in different directions, creating intersections that can fool the eyes. Try plumb-bobbing and make note of the results on confusing putts. Did plumb-bobbing give you the right line, or not?
Practicing this on a putting green with a familiar break will help you determine if you're performing the plumb-bob correctly.
One final note: Do not use this method on a putt that has more than one break.
*To determine your dominant eye, hold one arm straight in front of you, with the thumb pointing up and aligned with an object in the distance, such as a tree. Close one eye, then open it and close the other. One eye will cause the thumb to “move,” while it will remain in basically the same place when looking through the other. Your dominant eye is the one through which the thumb stays still.

How and Why to Plumb Bob a Putt
Reading your putts correctly is one of the single-most important factors in a good short game. While you obviously need to make a good stroke in order to hole your putts, a great stroke will do you no good with the wrong read. Only when those two elements come together can you expect to consistently send your ball into the bottom of the cup. Reading greens is a skill that very few amateur golfers practice, but spending some time improving in this area can dramatically lower your scores.
One of the long-standing methods used by professional and amateur golfers alike to read putts is the plumb bob. By using the shaft of your putter to create a vertical line, it is possible to get a good indication of whether a putt will break to the left or to the right. While plumb bobbing putts is not a method that works for everyone, some great putters swear by this technique. Once you know how to properly plumb bob a putt, it is a method that you can pull out of the bag when you need some assistance settling on the perfect read for a specific putt.
Something to keep in mind as you learn how to plumb bob your putts is that you want to avoid becoming a slow golfer in the process. It is important that all golfers are responsible for their pace of play, so don't allow yourself to get so caught up in the plumb bob part of your read that you take forever to hit the putt. Work on this technique on the practice putting green so that you can use it quickly when you get out on the course.
There is a potential advantage to be gained by using the plumb bob, but it is not appropriate for every putt. For example, long putts of 50 feet or more probably aren't a good candidate for this method, because putts of that length will tend to have multiple breaks. Also, short putts of inside three feet won't really benefit from the plumb bob technique. At that distance, you will be better off crouching behind the ball to get your read, and then stepping up to make a confident stroke. The 'sweet spot' for using the plumb bob to direct your putts into the hole is in the range of 10' to 30' or so. With the plumb bob in your arsenal, you can put it to use on putts of this length to gain an advantage over your competition.
All of the instruction contained below is based on a right handed golfer. If you play left handed, please reverse the directions as necessary.
Three Reasons to Plumb Bob
If you have been playing golf for a long period of time without plumb bobbing your putts, you might wonder why you would need to start now with this technique. After all, you have been getting along just fine playing the game with just your normal methods of green reading, so why bother? Well, it is all about adding additional tools to your bag. Just like it will help your game to add a new ball flight to your arsenal, so too can it help your putting to add the plumb bob technique to your green reading process. Is it required to play good golf? No, but it certainly is nice to be able to use it when you need it.
Following are three great reasons to add the plumb bob to your list of options on the golf course –
- Break the tie. On some putts, it seems impossible to decide which way it is going to break. If you stand on one side of the hole, it looks like it breaks in one direction. However, when you stand on the opposite side of the hole, it appears to break in the opposite direction. Many golfers refer to this as a 'tie' read, because there is no way to determine which read should win out. When you encounter this circumstance on the course, having the plumb bob available is a great way to break the tie. You can put this handy method to use and quickly determine if the putt will actually move to the right or the left.
- Build your confidence. Just like in any other area of the course, confidence is extremely important on the putting green. A golfer who is not confident in the read they have chosen for their putts will stand very little chance of making those putts. With that in mind, using the plumb bob is a great way to build some confidence prior to making a stroke. By using the plumb bob to confirm your read, you can settle your mind on a specific line and then get to work on hitting a great putt. They will never all go in, but your performance will benefit greatly from the boost of confidence that the plumb bob can offer.
- Relieve some pressure. When you start to get nervous on the course, you can begin to over-analyze everything that you do – including reading your putts. Relying on the plumb bob to provide you with a read is a great way to relax some of that pressure. Rather than agonizing over the read that you are going to pick for a given putt, you can just go along with what the plumb bob is telling you. In some ways, it is almost like having a caddy read your putt for you – simply go through the plumb bob process, get the read, and hit the putt.
Even if you already consider yourself to be a good green reader, and a good putter, you can always stand to get better. Work on learning the plumb bob process using the tips below, and put it into use on the practice green at your local course. From there, if you find that it is working, you can get ready to take it out onto the course for your next round.

Identify Your Dominant Eye
In order to successfully plumb bob your putts, you will first want to identify your dominant eye. Since you only have one eye open while you are plumb bobbing, it is important that you use your dominant eye for the job. This might not be something that you have thought about before, but it is actually quick and easy to identify which is your dominant eye.
Use the following steps to confirm which of your eyes is dominant –
- Sit down in a chair wherever you are. This 'drill' can be completed anywhere, so don't worry about being in any specific location to complete this exercise.
- If you are indoors, pick out an object in the room that is at least a few feet away from you. If you are outside, pick out something that is no farther than 50 feet away or so (and still more than a few feet away from you).
- Take your right hand and hold it up in front of you. With both eyes still open, stick out your thumb and hold it 'over' the object you have selected.
- Now close one of your eyes. Did the object disappear completely? If so, the eye that is still open is your dominant eye. If not, the eye that you closed is your dominant eye.
For example, imagine that you closed your left eye and found that your thumb was now blocking out the selected object. That would mean that your right eye – the one that is still open – is dominant. You want to use your dominant eye when you are plumb bobbing, so in this case, you would keep your right eye open when lining up your putts.
The process above only takes a few seconds, but it can be a big help when trying to learn how to plumb bob your putts correctly. If you were to try plumb bobbing while using your non-dominant eye, the results would likely be less than ideal. Test for your dominant eye and then take that information on to the next step in learning how to plumb bob correctly.

Plumb Bobbing Your Putts
First use the following steps to confirm which of your eyes is dominant –
- Sit down in a chair wherever you are. This 'drill' can be completed anywhere, so don't worry about being in any specific location to complete this exercise.
- If you are indoors, pick out an object in the room that is at least a few feet away from you. If you are outside, pick out something that is no farther than 50 feet away or so (and still more than a few feet away from you).
- Take your right hand and hold it up in front of you. With both eyes still open, stick out your thumb and hold it 'over' the object you have selected.
- Now close one of your eyes. Did the object disappear completely? If so, the eye that is still open is your dominant eye. If not, the eye that you closed is your dominant eye.
With your dominant eye properly identified, it is time to learn how to plumb bob your putts. The process is not complicated, and it shouldn't take more than a few seconds to complete. However, it is important that you get all of the steps right if you are going to achieve good results. If you miss any of the crucial points involved with plumb bobbing, you could end up giving yourself the wrong read – and unlike when you have a caddy, there will be no one to blame but yourself.
- The first step when you prepare to plumb bob your putt is to stand behind your ball by about 10 or 15 feet. You should be standing on a direct line behind the putt so that your body, the ball, and the hole form a straight line. Depending on your height, you may need to crouch down slightly to get in position for plumb bobbing the putt. Taller players will likely feel the need to crouch a little bit, while shorter golfers should be able to stand up straight.
- Once you are in position, the next step is to hold the putter up in your right hand so you can scope the putt. Take the putter in your right hand, and hold it between your thumb and pointer finger. You should be grasping the shaft of the putter just below the bottom of the grip so that the putter head is pointing down toward the ground. The goal at this point is to have the putter shaft perfectly straight up and down as it hangs from your hand. To accomplish this goal, you should be holding the club very lightly between your two fingers. If you squeeze the club, you may not get the shaft into a vertical position. Maintain a light grip and let the club hang freely.
- Now that you have the putter shaft handing vertically, the next step is to line the shaft up with your putt. Hold the club out in front of you and try to 'cover' the ball and the hole with the shaft of the putter. The bottom of the shaft should be covering the ball, while the hole should be covered up toward the top of the shaft. If you can't get the ball and the hole both lined up behind the shaft of the putter, your putt is probably too long for a plumb bob read.
- The final step comes when you have the shaft of the putter positioned correctly to cover the hole and your ball. At this point, you need to close your non-dominant eye so you can read the putt with only your dominant eye open. When you close one eye, you should notice the hole move to one side or the other. If the hole moves to the left of your putter shaft, you will know that the putt should break to the left. If the hole moves right of your putter shaft, the putt should break to the right. Should the hole happen to remain right behind the putter shaft even after you close one eye, you will know that you are dealing with a straight putt.
The process above is everything you need to know in order to plumb bob your putts successfully. To practice this routine, head to your local golf course and find the practice putting green. At first, you want to try this technique on a dramatically breaking putt so you can test how accurate it is for you. So, find a severe slope on the putting green and go through the process. Since the putt has a hard break from one side to the other, you won't actually need the plumb bob to read the putt for you – the break will be obvious. Therefore, you can complete the plumb bob steps to make sure your results match up with what you are seeing with your regular green reading. If the putt will break hard to the left, and the plumb bob tells you the same thing, you will know you are executing the process correctly.
Plumb bobbing, just like anything else in golf, takes practice. It would not be a great idea to simply try this method once or twice and then put it into use on the golf course. Instead, you should spend plenty of time on the practice green working on your plumb bob until you are able to consistently match up your read to the actual slope of the green. Work through the process by reading a putt normally, then plumb bobbing it, then hitting the putt. As you get better and better at using this technique, you will find that your plumb bob reads become more and more accurate.

Other Green Reading Factors
If you try to read your putts by plumb bobbing alone, you aren't going to be a very good putter. Yes, the plumb bob can be a valuable tool, but it is only one piece of the green reading puzzle. A good player will use all of the information available to him or her in order to select the perfect line and speed for a given putt. Feel free to add plumb bobbing to your list of tools that you use to properly read greens, but don't forget about everything else that needs to be done as well.
Be sure to include the items on the following list as part of your regular green reading routine.
- Elevation check. The biggest mistake that the average golfer makes when reading a putt is forgetting to consider the vertical change between their ball and the hole. You always need to know how much uphill or downhill you are putting prior to picking your final line. The amount of break that you play will be greatly influenced by whether you are putting uphill or downhill, so be sure to review this part of your putt first before moving on to other steps.
- Read behind the hole. Take a quick moment to read your putt from behind the hole as well as from behind your ball. The view from behind the hole will allow you to get a better perspective on the slope of the green during the last few feet of the putt. You might have a tough time judging the end of your putt when you only look from behind the ball, so take a quick walk around for a view from all angles.
- Drainage. Did you know that the drainage around a green can tell you a lot about which way your putt will break? Look around the green to find the drains that the course uses to get water off of the course. Water, obviously, flows toward the lowest spot around the green, so that is where the drains will be. Conversely, sprinkler heads are often near the high points because they don't want them to be flooded with standing water. Find both the drains and the sprinkler heads around a green and you should have a good idea for the overall slope.
- Grain. Not all greens have enough grain to be considered when making your read, but if you are playing on greens with a strong grass like Bermuda, you will need to take the grain into account. Generally speaking, you are putting into the grain when the grass looks dull, and with the grain when the grass is shiny. Ask in the pro shop before your round if there is a significant amount of grain in the greens, and then pay attention to the affect that it has during your warm up. Putting on grainy greens can be a challenge at first, but it is a skill that can be learned just like anything else on the golf course.
- Decisiveness. This last point isn't part of your green reading process. Instead, it is simply a reminder that you always need to be decisive when you are selecting your line. If you aren't 'sold' on that line that you have picked for the putt, you are never going to make your best stroke. Before you stand over your ball and hit the putt, be sure you are 100% convinced in the combination of line and speed that you have selected.
There is a lot to do when getting ready to hit a putt. Arguably, there may be more to do prior to a putt than any other shot on the course. With that in mind, you need to learn how to work through your pre-putt process in a way that provides you with all of the information you need while not slowing down the pace of play. If you were to think through all of these various points step-by-step as you read your putt, it could take five minutes before you are ready to hit – and that isn't going to work. Instead, you need to become so comfortable with the process that you are able to complete it automatically.
To get to that point, practice is required. On the practice putting green, work through your green reading routine before you hit your putts. Don't just walk around the putting green rolling your ball at various holes – instead, go through your full process of reading the green, including the plumb bob, and then make a stroke. By rehearsing this process over and over again, you will be able to complete it much quicker during an actual round of golf.
The plumb bob won't enable you to make every single putt that you look at. It will, however, help you acquire more information about the putt you are preparing to hit. Any extra info you can get on the putting green will be tremendously helpful, so take the time to learn how to use this handy green reading technique. With more information in hand on the putting green, you can expect to see a few more putts start to fall in the cup.


