Although fairly simplistic, the “toe-up” golf practice swing is one of the best tips in golf. We'll show you how it's done, and how to take it to the next level for improved accuracy.
Classic “Toe-Up” drill:
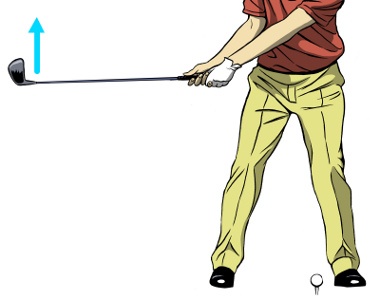
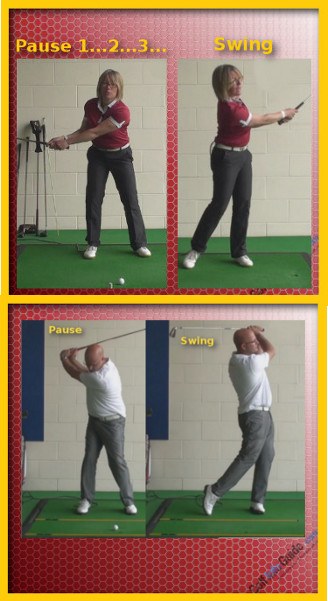
- Using your standard setup, initiate your backswing and stop when the shaft is parallel to the ground. The toe of the club should point to the sky. If not, this indicates your body, arms and hands are not turning away from the ball correctly.
- Next, instead of continuing the backswing, start your downswing and continue through until the shaft is again parallel to the ground. Check the club's toe; it should again point to the sky.
- Repeat this mini-swing between the two checkpoints until muscle memory is achieved. Once you're able to reliably produce the correct positions at both checkpoints, you can progress the training drill to hitting golf balls. This will demonstrate the drill's effectiveness in producing a straighter ball flight.
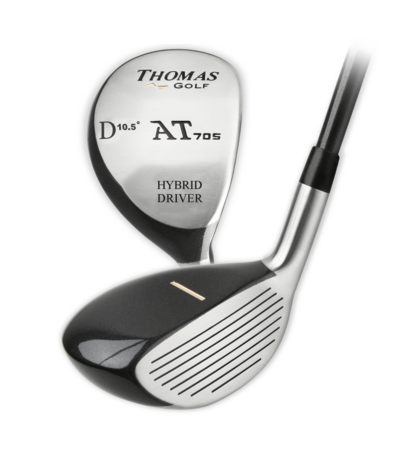
To make this drill even more productive, take advantage of the shot alignment feature designed into the top plane of Thomas Golf brand equipment (pictured at right). Improved “Toe-Up” Drill:
Follow the same three steps listed above, but instead of looking at the toe of the club, look at the shot alignment indicator. At each checkpoint (backswing and follow-through), the shaft and the indicator should be parallel to the ground to assure the club is in correct position. This feedback is more reliable than looking at the toe, because the toe's rounded shape can appear to be positioned properly when it's actually off by many degrees.
There's another big advantage to using a Thomas Golf club for this drill: You can add a checkpoint at the impact zone. When the clubhead is at the spot of impact with the ball, the indicator should point directly down your target line.
Grab any iron, wood, hybrid or driver designed by Thomas Golf and try it yourself; you'll be impressed by the resulting, straighter golf shots.
Toe Up for Straighter Golf Shots
Controlling the position of the club face is one of your most important jobs as a golfer. As long as you have control over the club face throughout your swing, you should be able to hit consistent shots that fly in the direction of your target time after time. However, if your club face position is changing dramatically during your swing, you will find it rather difficult to even strike the ball solidly at impact. Learning how to manage the club face is a large part of making yourself into a better player.
As you work on your game, it is helpful to have checkpoints in your swing that you can use to evaluate progress and look for mistakes. One of those checkpoints happens when the shaft of the club becomes parallel to the ground – both during the backswing and the forward swing. This is a convenient spot that you can use to stop your swing, hold your position, and evaluate how everything looks. If your club face appears to be in a good position when the club is parallel to the ground, it will likely be in a good position at impact as well.
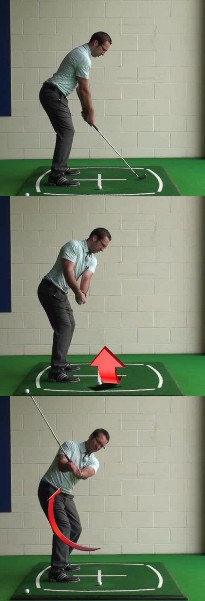
Ideally, you would like to see the club face in a toe up position when the club is parallel to the ground. This applies equally to the backswing and forward swing. A toe up position is indicative of proper rotation around your body during the swing. Many amateur golfers have problems with this rotation, and it leads to getting the club face either too open or too closed. When the club face is open or closed as the club is parallel to the ground, you will have very little chance of returning it to square at impact. Mastering the correct rotation in your swing is vital if you are going to position the club face correctly.
Following are the two basic mistakes that can be made when checking your swing at the parallel position in the backswing –
- Club face closed. If the club face is pointing down toward the ground, instead of having the toe of the club pointed up toward the sky, you will know that the club is in a 'closed' position. This means that when you return to impact, the club face will more than likely be pointed to the left of your intended target. A lack of rotation in your hands and arms is the usual culprit when you face this problem.
- Club face open. Many golfers over-rotate the club during the backswing, leading them to find an open club face position when the club is parallel to the ground. If you are making this mistake, you will see that the face of the club is pointing up toward the sky. As you might imagine, over rotation of the hands and arms is the likely cause of putting the club in an open position early in the backswing.
Whether you have the club face open or closed in your backswing, it is crucial that you correct the mistake as soon as possible. It is difficult to play consistent golf when the club face is out of position. Use the parallel position check as a way to evaluate your club face angle and then make the necessary adjustments to your swing mechanics.
All of the instruction below is based on a right handed golfer. If you play golf left handed, please reverse the directions as necessary.
Fixing a Shut Club Face
If you consistently fight either a pull or a hook in your golf game, there is a high probability that you have your club face in a closed position during the backswing. No matter what else you do, it is unlikely that you will fix these ball flight problems unless you correct the position of your club face. Once you get the club face in a toe up position when the club is parallel to the ground, everything else should fall nicely into place.
Before trying to make any corrections to your swing, it is important to check and make sure that you actually are in a closed position with your club face. To check, follow the simple steps below –
- Take your normal address position with a short iron. You won't be hitting any actual shots, so you don't even need to be at the golf course for this drill.
- Once you are in your stance, start your backswing. When the club shaft becomes parallel to the ground, pause your swing and hold that position.
- Without moving the club, turn your head to the right and look at the position of the club head. Is the toe pointed up toward the sky? If it is, you are in a good position and can cross this potential problem off of your list of swing issues to review. However, if the club face is pointing down toward the ground, you will need to work on making a correction to your takeaway.
When you find that you are in a closed position at this point in your backswing, there are a couple of quick fixes that you can use to correct the problem. Don't worry about dealing with a long and complicated swing change process – most of the time, you will be able to correct this part of your swing in just one or two practice sessions. Try the following two tips to get your swing into the perfect toe up position.
- Keep your left shoulder up. As the takeaway begins, your shoulders should be rotating away from the target in order to move the club into position. However, some golfers get into the habit of dropping that left shoulder as the swing starts instead of turning it to the right. When that happens, your weight will start to lean toward the target and the club will be unable to rotate properly in the backswing. This is commonly known as a reverse pivot. If you feel like you are making this kind of mistake in your takeaway, work on keeping a level plane in your shoulders throughout the early part of your swing. Try turning your left shoulder under your chin and make sure you are maintaining good balance. Your hands should be passive as you use the turning of your shoulders to rotate the club into the correct position when it reaches parallel to the ground.
- Strengthen your grip. Some players who use extremely weak grips have trouble moving the club into the right position during the backswing. With a weak grip, your hands will have very little control over the club head – meaning they won't be able to help rotate the club into that toe up position that you are trying to achieve. Prior to starting your swing, turn both of your hands slightly to the right on the grip of the club. You don't want to make a drastic change to your grip, so be sure to only turn your hands gradually to the right before trying your swing again. It shouldn't require a big change in your grip to create a better outcome during your takeaway.
After working on one or both of the changes above, go back and do the previous drill to check your club face position. Hopefully, you will find that the adjustments to your technique have resulted in the club finding the toe up position when the club is parallel to the ground. Once you are happy with the position of your club in the backswing, go ahead and visit the driving range to see how much your ball flight has improved as a result of your efforts.

Fixing an Open Club Face
Dealing with the opposite problem, having the club face open in the backswing, is probably more common among amateur golfers. Over rotation will lead to a variety of problems with your ball flight, but one specifically causes the majority of trouble for the average golfer – the slice. Opening up the club face early in the backswing is one of the easiest ways to create a slice pattern in your game. If you would like to eliminate that slice and hit longer and straighter shots on a regular basis, getting your club into a toe up position should be your first objective.
To get started, use the same drill that was highlighted above for working on a closed club face. When you pause the club at the parallel position, you will again be hoping to see that the toe of the club is pointing up to the sky. If you see instead that the face of the club is pointed skyward, you will know that you have over rotated during the takeaway.
The two tips below are designed to help you correct the over rotation in your takeaway –
- Stabilize your right knee. Many players who over rotate during the takeaway make the mistake of allowing their right leg to straighten up early in the swing. When your right leg gives up the position that it had at address, you will allow your club to swing too much to the inside during the takeaway. Usually, this means too much rotation as well. To avoid that fate, pay attention to the position of your right knee and keep it steady as you swing back away from the ball. If you can hold your right leg in place until the club reaches parallel to the ground, you will be far less likely to over rotate the club face.
- Weaken your grip. Logically, this is the opposite tip from players who have problems with under rotating the club during the takeaway. If your hands are too active early in your swing, moving them into a weaker position is a quick and easy fix. At address, turn both hands slightly to the left on the grip and then try your takeaway again. Most likely, you will reduce the rotation in your swing and the club face should be in a far better position at parallel.
Millions of golfers fight a slice, and many of them could greatly benefit from simply fixing the position of their club face early in the swing. If you fall into that category, don't allow the slice to frustrate you any longer. Take the time to use the tips above and correct your club face position as soon as possible. Once that work is done, you will find that the slice has become a problem of the past.

The Mini-Swing Drill
After you have spent some time straightening out your takeaway, the next step is to start hitting some shots on the driving range. However, you don't want to just jump right in to hitting full shots with your driver. Instead, you should build your swing up gradually, making sure that you have properly fixed your club face position before you go all the way to making full swings.
With that in mind, the following drill is a great way to become comfortable with using the toe up position when the club is parallel to the ground. The swings you make with this drill aren't going to hit the ball very far, but they will go a long way toward improving the quality of your swing as a whole.
Follow the step-by-step instructions below to complete this drill successfully.
- For this drill, you will need to be at the driving range with a bucket of practice balls and at least one of your clubs. The ideal club for this drill is a seven iron, but any of your short or mid-irons will work just fine.
- It is important to pick a very specific target for this drill before you start hitting shots. The drill is all about controlling the club face and developing your accuracy, so you need some kind of benchmark to be sure you are making good progress. Look around the driving range to find a good target for each of your shots. This target should be somewhere in the range of 40-70 yards away from where you are standing.
- Prior to hitting the first ball, take your address position just as you would before any other shot you hit. Don't cut corners at this point in the drill – it is very important that you work through your pre-shot routine to build a stance that is technically sound. Without a good address position, the rest of the work that you do will likely go to waste.
- Once your stance is in place, you can go ahead and hit the first ball toward your target. However, you won't be using your full swing. Instead, you will only be swinging the club back until the shaft is parallel to the ground. At that point, start swinging the club forward into the ball. After impact, try to stop the club when it reaches parallel to the ground in the forward swing. You might not be able to do this perfectly each time, but do your best. Not only should the club be in a toe up position when you stop your backswing at parallel to the ground, but it should also be in a toe up position when you cut off your forward swing at the same point.
- Your focus during these half swings should be on making solid contact. If you are able to strike the ball cleanly, you will be able to get great feedback into the position of your club face at impact. When the ball flies right at your selected target, you will have confirmation that you are doing things right in your swing.
- Continue hitting shot after shot using the process highlighted above. You should be able to hit quite a few balls using this drill because the swings won't be very physically taxing. If you would like, you can switch clubs during the drill just to establish a feel for the club face with a variety of your clubs.
- When you are done using this drill, go ahead and hit a few full swing shots. As you make these full swings, remember the points that you were working on during the drill and don't lose track of the quality club face position that you have worked so hard to establish.
The results of the shots you hit during the drill above will tell you everything you need to know about the position of your club face. Since you are only hitting these shots a short distance, they won't have enough time to curve in one direction or the other. That means that the path they take toward the target will be almost entirely due to the position of the club face.
If you are hitting the ball dead at the target each time, you can feel good about your club face position and move on to other drills. However, if you are missing the mark, you will quickly know that something is wrong.
- If the ball is missing to the left of the target, your club face is closed at impact. Work back through the instructions above for a closed club face until you are able to make the necessary corrections.
- If the ball is missing right of the target, the club face is open at impact. Again, use the directions provided earlier to address this problem.
It might not be very exciting to stand on the range and hit shots that only fly 40 or 50 yards, but this drill can be a valuable tool in your efforts to become a better player. With an improved ability to control your club face through the hitting area, you can expect to find more consistent ball striking results on the course.

The Risk in Rushing
Putting your club face in a good position during the backswing is mostly about good mechanics, but timing plays a role in this equation as well. If you were to rush your takeaway – as many players do when they start to get nervous – you could find yourself over rotating the club even with proper mechanics.
If you are a player who is prone to rushing when you get out on the course, you will need to pay careful attention to this point to avoid wasting all of the work you have done to fix your club face position.
The problem with rushing your takeaway is that your body won't be able to keep up with your arms and hands. As you move the club away from the ball, your shoulders should be controlling your turn to the right. However, if your hands and arms are moving too quickly, your shoulders will fall behind and they won't be able to catch back up.
That means the club will be turned to the inside of the correct path, and the club face will be pointing up toward the sky when you reach parallel to the ground. This is probably not an issue that you have to deal with on the driving range, but it can become a major problem on the course when nerves and adrenaline enter the equation.
When you are playing a round of golf, take a moment prior to each shot to take a deep breath and slow down your thinking. It is easy to become distracted by a variety of thoughts when you are getting ready to play your shot – and this distraction can lead to rushing your swing. By slowing down your thinking and picking out a very specific target for the shot, you can block out the 'noise' and make a great swing.
Finding the toe up position in the backswing and forward swing when the club is parallel to the ground is something that every golfer should strive to accomplish. The club moves too quickly through the hitting area to be able to manipulate it accurately, so you need to be in a perfect position before you get to that point. Work on the tips and drills contained above to manage your club face position and hit the most consistent shots of your golfing life.


