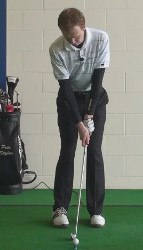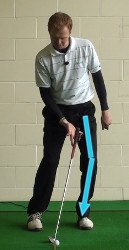
While making a good full swing requires transferring weight from the left (front) foot to the right foot going back, the shorter, simpler chipping motion does not. Yet some golfers either set up to chip with too much weight on their right side or slide to the right during the swing. The result is typically a thin or fat shot.
This drill will teach and ingrain the proper weight distribution for effective chipping:
- Address the ball with your feet just a few inches apart and the ball in the center of your stance.
- Place 60% of your weight on the left foot.
- Drop your right foot back with the heel off the ground and only the toe touching the turf. You may feel more weight tilt onto your left side.
- Chip the ball while keeping the right heel up and the weight on your left.

That's the feeling you want when chipping with both feet on the ground. With a little practice, you'll hit chips more solidly and eliminate those scooped shots. If necessary, you can even chip with your heel up on the course – it's well within the rules.

Simple Drills to Heal Chipping Ailments
Let's be honest – most amateur golfers struggle with the chipping portion of this great game. If you spend a few minutes around the practice chipping green at your local course, you will probably notice two things. For one, there aren't very many people practicing their chipping, as most of them are over on the driving range swinging away. Also, those who do stop by the chipping area tend to struggle to even make solid contact with the ball. It could easily be argued that the biggest gap between professional and amateur golfers exists in the area of chipping. The average pro golfer is excellent and chipping the ball up close to the hole, while the average amateur is happy just to get the ball out of the rough and onto the green.
In this article, we are going to provide you with some simple chipping drills that can be used to improve your performance from around the greens. Instead of ignoring your chipping problems, it is better to meet them head on in an effort to correct this part of your technique once and for all. Golf is a hard enough game as it is – you don't need to make it any harder by struggling to even hit your chip shots solidly. As long as you are willing to put in a little bit of time and effort in the short game practice area, you should be able to improve on your chipping performance rather quickly.
At first, you might not think of chipping practice as being very exciting. After all, most players would prefer to launch the ball well into the distance with their driver than chip the ball just a few yards with a wedge. However, there is a good reason to think of chipping practice as one of the best things you can do with your golf time – the opportunity for lower scores. In terms of return on your time investment, practicing your chipping just might be the best single thing you can do when you head to the course.
A little bit of math will help to highlight just how important it is to practice your chipping. Let's say for a moment that you are a golfer who regularly shoots scores in the high 80s and low 90s for 18 holes. With that profile, you probably hit around six greens in regulation per round – which means that you miss twelve greens (or so). So, you will be chipping on twelve different holes, and you will need to get those chip shots up and down in order to save pars. If you are a poor chipper, you may only get up and down twice in twelve tries. However, after you have practiced your chipping, you could up that number to six or even eight out of twelve. Suddenly, you are saving four to six shots per round thanks only to better chipping. You can now shoot scores in the low 80s on a good day, and you might soon threaten to break into the 70s. The impact of improved chipping is powerful, and it can be seen almost immediately after you begin to practice.
All of the content below is based on a right-handed golfer. If you happen to play left-handed, please take a moment to reverse the directions as necessary.

Common Chipping Problems
Later in this article, we will offer up three drills for you to use to improve your chipping performance. First, however, we need to talk about the common chipping problems seen throughout the amateur game. The issues listed below are frequently seen among amateur players, and you may have even dealt with one or two of them in your own game as well. Once you have a clear picture of the many ways in which a chip shot can go wrong, we can get down to work on using some drills to fix your technical mistakes.
- Hitting the ball fat. This is probably the most common chipping mistake of all. Countless amateur golfers hit behind the ball at impact, catching the turf prior to contacting the ball with the club face. There can be a number of causes for this mistake, but the end result is the same – the ball comes up short of the target, and you are either left with a long putt or another chip shot. It is nearly impossible to post low scores if you are regularly hitting the ball fat on your chip shots, because these kinds of mistakes regularly lead to double bogeys and worse. Cleaning up this area of your game should be a top priority if you have aspirations of playing at a higher level.
- Hitting the ball thin. On the other end of the spectrum, you may be in the habit of hitting the ball thin rather than fat. Of course, this is just as much of a problem as fat shots, as the ball will go shooting across the green when you catch it with the leading edge of your wedge on the way through the hitting area. In some situations, a thin chip shot can even be worse than a fat one, depending on what is waiting on the other side of the putting surface.
- Decelerating through impact. Even if you make good contact with the ball, you could still be left with a disappointing shot if you fail to keep the club moving at an appropriate speed. This is a common mistake as many amateur golfers feel like they are going to hit the ball too hard if they keep swinging at the same speed through the ball. When you make the mistake of decelerating on your shots, you wind up struggling to control your distance at all. Of course, distance control is the main challenge when chipping, so this is a major problem. Learning how to accelerate on chip shots will not only help you around the greens, but on the greens as well – decelerating is a common problem when putting, but eliminating from your chipping game might make you less likely to make this error with the flat stick.
- The yips. Just as you can get the yips on the green when putting, you can also deal with this frustrating ailment when chipping from around the green. Usually, the yips start out as a small problem, but unfortunately, they tend to get worse and worse over time until you take action. And, of course, they also tend to pop up at the worst possible time – such as when you are facing an important chip shot near the end of a round. If you have noticed that the yips are starting to become an issue in your chipping game, the drills provided throughout the rest of this article should be of great assistance. By returning your focus to the technique needed to hit good chip shots, you may be able to banish the yips from your mind once and for all.

Drill #1 – Left Hand Only
The title of our first drill says it all – you are going to hit chip shots with only your left hand on the club. This is not something you should do on the course, obviously, but using this drill during practice can go a long way toward teaching you the proper feel for the club and ball at impact. A cleanly-struck chip shot using only the left hand will feel just as solid as a chip shot hit with both hands. After a period of practicing with just the left, using two hands to hit chip shots is going to seem like a breeze.
If you would like to use this drill in your next practice session, please follow the steps listed below.
- Pick a club. To get started with this drill, you are obviously going to need a golf club. While you could use any of your lofted clubs for this purpose, the pitching wedge is a great place to start. Using higher lofted clubs like a sand wedge or lob wedge will make these shots a greater challenge, which is not exactly what you are looking for right now. Make things easy by using a pitching wedge and move on to other clubs after you get the hang of one-handed chipping.
- Ball, lie, and target. Before you can hit any shots, you are going to need a golf ball, a place to play from, and a target for the shot. Set yourself up in the short game practice area at your local course, and place at least one golf ball down on the ground. You want to be playing from a clean fairway lie at this point in time. Also, you should be picking a target on the green which is easy to reach, and is not placed on a significant slope. Basically, you are trying to make these chip shots as easy as possible.
- Take your stance. To setup for your chip shot, take your stance as you would prior to any regular chip shot on the course. Place the ball near the back of your stance, lean slightly to the left, and open your stance relative to the target line. When everything is in place, the last thing you are going to do is remove your right hand from the grip. While hitting the shot, you can keep your right hand in your pocket, or behind your back.
- Hit the shot. With all of the setup out of the way, the only thing left to do is hit the shot. Since you only have one hand on the club, you are going to have to do more work than normal with the big muscles in your back and shoulders. This is a good thing. Use those large muscles to keep the club steady while you swing back and through. At impact, make sure you keep the back of your left wrist flat and firm through the hitting area. This is probably the most important part of the drill. With a firm left wrist, the club is going to be stable and the shot should be struck solidly. Also, keep your eyes down on the ball until it is sent on its way.
- Judge the results. How did you do? Was the shot struck cleanly, or was the contact slightly fat or thin? After you have reviewed the first shot, go ahead and hit another. Feel free to spend a few minutes practicing like this before you revert back to hitting two handed shots.
There are two main lessons to be learned from this drill. First, you are going to learn how keeping your left wrist solid at impact can lead to clean chip shots. Also, you are going to gain an understanding for the benefit of using your big muscles to swing the club in the short game. There is a lot of stability to be gained through the use of your back and shoulders, as long as you don't let your hands get in the way. Add this one-handed drill to your chipping practice routine, and feel free to use it during your putting practice sessions as well.

Drill #2 – Two Golf Balls
One of the most basic rules of the game of golf is that you only play with one ball at a time. That is true when you are on the course, but there are no official rules which govern how you can practice your game. To learn more about the proper chipping technique, it is a good idea to use two golf balls – although you will only be actually hitting one of those balls. It might sound complicated to use two golf balls in one drill, but this is actually quite a simple practice routine to use once you get the hang of it.
When you are ready to try out the two golf ball chipping drill for yourself, proceed using the following steps.
- As far as equipment goes, you are obviously going to need two golf balls for this drill. You will also need a wedge, and you may want to have a couple of golf tees available as well.
- To setup for the drill, you are going to again find an easy chip shot somewhere around the practice chipping green at your local course. In fact, if you have already completed the one-handed chipping drill, you can use the same lie for this drill. Place the first golf ball down on the ground and put your body in position to hit the shot. However, you are going to stop at address just prior to beginning your swing.
- Before the club goes in motion, reach down and put the other golf ball in place. It is going to rest approximately six inches behind the original golf ball, on an extension of the target line. In other words, the second golf ball should be in your way when you try to make a standard backswing for your chip shot. If you were to swing the club low to the ground, you would hit the second golf ball backward before completing your backswing.
- Now that everything is set, go ahead and hit the ship shot. The goal is simple – to hit a solid chip toward your target without touching the second golf ball. To do so, you are going to need to make a relatively steep swing while hitting down on the ball sharply at impact. You will probably need to use a bit of hand action early in the backswing to clear the second golf ball, and you are going to need to avoid 'scooping' the club through the hitting area on the way through. Any mistakes you currently have in your chipping technique will quickly be exposed when you place the second ball behind your club prior to playing your shot.
- As with any other drill, you should get better and better at executing your swing over the second ball with practice. Once you have hit a few shots this way, remove the second ball while remembering what you have learned. With any luck, you should now be striking crisp chip shots which have plenty of backspin thanks to your downswing angle of attack.
The great thing about this drill is the instant feedback that it provides. If something goes wrong, you will know it right away because you will contact that second golf ball. There won't be any doubt as to what has happened – you will know you made a mistake, and you will need to fix it. Consider adding this drill to your standard practice routine to engrain the downward angle of attack needed to become a reliable chipper out on the course.

Drill #3 – Hitting Your Spot
You should be picking out a landing spot for each and every chip shot you hit on the course. Rather than just looking at your eventual target as you prepare to swing, you should be looking at the landing spot you have identified. Golfers who pick, and then hit, landing spots for all of their chip shots will be a big step ahead of the game.
Yet again, we are going to lay out this drill in step-by-step format. This is one of the best drills you can do to prepare yourself for the challenges you will face on the course, as it is going to focus your mind on nailing your landing spot time after time.
- You will need just the standard equipment for this drill – a wedge, golf balls, and a place to chip – plus you will need a golf towel. Ideally, this towel will be one of the smaller types that clips onto your golf bag, rather than a full beach towel. As is usually the case with any kind of short game drill, you want to start out by playing from a simple, easy-to-manage lie. You can always look for more difficult lies once you have spent some time practicing the basic shot.
- To prepare for this drill, you are going to evaluate the chip shot in front of you and pick a landing spot that you think will work. of course, the landing spot needs to keep in mind the club you are going to use, as the ball will need to carry farther onto the green with a lob wedge than it will with a pitching wedge. Once you have selected your landing spot, lay the towel out flat on the green, covering your chosen spot.
- The goal now is simple – chip the ball so that it lands on the towel and then bounces out the rest of the way toward the hole. This is going to be far easier said than done. Chipping the ball accurately enough to hit the towel will be a serious challenge, especially if there is a fair amount of distance between the ball and the landing spot. It should be noted that if you do actually land the ball on the towel, you will get a different bounce that you would get if the ball landed on the green – so don't worry if the ball doesn't wind up close to the hole in the end.
- Go ahead and chip as many shots as you would like toward the towel. When you are on the course for your next round of golf, picture that same towel covering your landing spot on all chip shots to help yourself focus in on the task at hand.
Chipping is a challenging, yet very important, part of the game of golf. We hope that the three drills provided above will help you get your chipping game on the right track. If so, it is almost certain that your scores are going to come down quickly, as good chipping is closely related to good scoring. Spend some time working on your skills around the green during an upcoming practice session and look forward to many up and downs throughout the rest of the season. Good luck!


