The golf slice is a really common and destructive golf shot.
It is a shot that starts left of the target then severely curves a great deal to the right of the target for a right handed golfer (left handed – the golf ball starts right of the target and curves a great deal to the left of the target). This shot will normally result in a lost golf ball, a golf ball that will find trouble or a golf ball that will be heading out of bounds. This tip is going to help you solve that problem and help create more power and consistency.
Problem – A sliced golf shot is generated when the swing path is classed as an out to in path and the club face will be open to the swing path, therefore causing a contrast between the club face and swing path causing the golf ball to curve off line. The more the golf ball slices, the more the golfer will swing from outside to inside, and the golf ball curves even more.
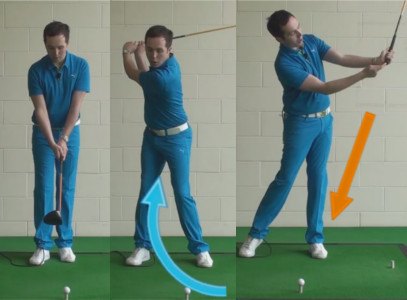
Fix – Create more of an inside downswing as opposed to over the top. The wall drill helps us to visualize how we can create more of an inside downswing. Then we can release the golf club to square the face at impact.
Key point – At the top of the backswing, feel like you have a wall that you are trying to hit that is directly behind you. Once the downswing begins, change the direction of the golf club to brush the wall, therefore changing your downswing making it more inside.
Key grip tips – The top hand goes on the golf club first, making sure we hold the golf club straight. Hold the grip in the base of the fingers and wrap the hand on top, pointing the thumb down the front of the grip.
Check point 1 – Make sure you can see 2½ knuckles on the hand when looking down.
Check point 2 – The thumb and index finger create a crease that points to your shoulder that is away from the target. Then place the bottom hand on the golf club, holding with the base of the fingers and wrap the thumb pad on top of the other hand's thumb.
Check point 3 – The crease between the thumb and the index finger points towards the shoulder furthest away from the target. Link the fingers at the back of the grip by either interlocking or overlapping the index finger of the top hand and the little finger of the bottom hand.
Top tip – Hold the club gently. Avoid strangling the golf club as this will restrict the correct hand action through the ball.
Releasing club tip – Once the grip has been neutralized, the idea would be to swing the golf club less from the outside of the ball. Therefore, attempt to swing the golf club more to the right of the target and release the golf club by crossing over the bottom arm with the top arm.
Top tip – Point the golf club's butt end towards where the golf ball started at set up at the half way position in the follow through.


